September 29, 2008

Crispy lentil fritters - Healthy Masala Vadai

IMG_1853

Dieting... We have all been there, done that.
Diets alone don't work. A healthy lifestyle combines a good balanced diet (when I say diet it means, a sane quantity of vegetables, whole grains, fruits, proteins, carbs, and fat) with a good amount of physical activity and is the key to a fit and healthy body. I am not going to go to the "mind" (as in body and mind) part here... it gets way too complicated.

I would ideally like to follow the "everything in moderation" theory, but sometimes it just doesn't happen, and binges do happen every now and then. But mostly that is the way to satiate every cravings that come your way. A little of everything.

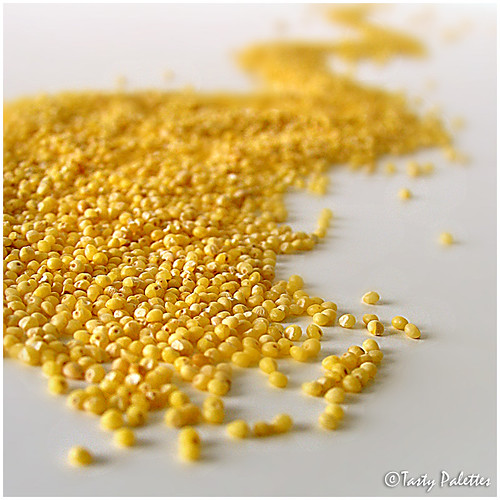
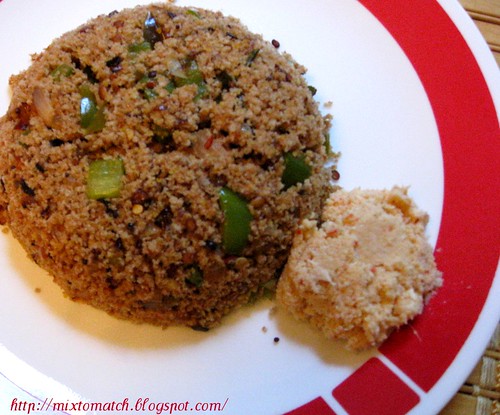
Lentils in general are low in fat and have a very high protein and fiber content. These split yellow gram lentils used in this recipe have a very low glycemic index and supposedly have almost no effect on the blood sugar level. And hence recommended for people with diabetes. If you need more information on the different type of lentils, this is a good place to start.

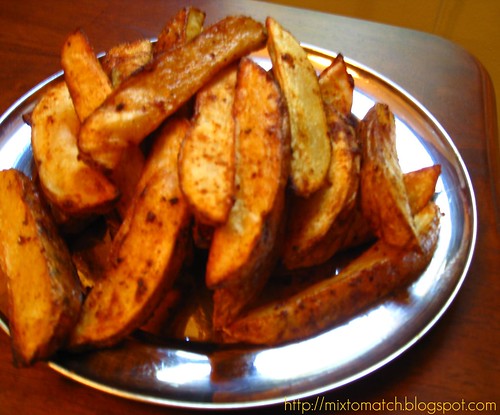
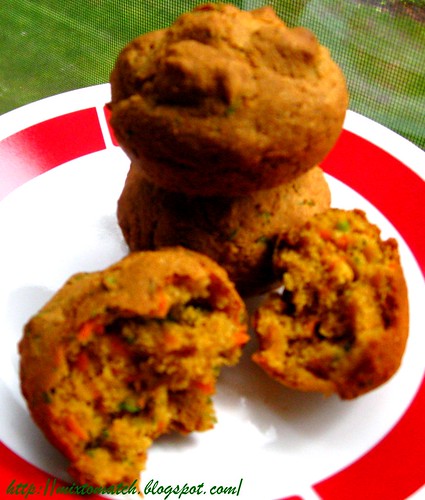
Crispy lentil fritters (basically our good old vadai) are fried and served as a snack during Tea time, or made during special occasions in India.
Remember those hot set of vadais right out from the frying pan served on a newspaper or a plantain leaf along with cup of tea? Makes my mouth drool even today.
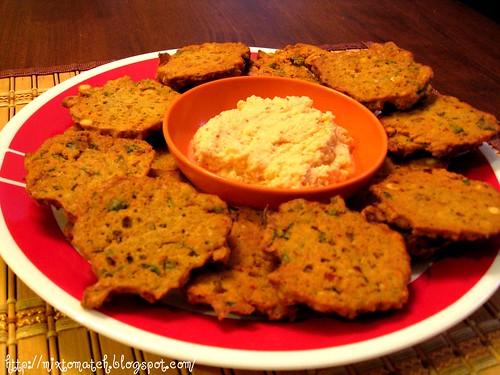
Since I always try to substitute the fried goodies with an healthier option and that is what this whole blog is about: "healthy food and living", I am very excited to share these baked fritters today. I felt that there was little or no compromise on the taste compared to the fried ones.
This is one of the best things that has undergone a successful transformation in my kitchen. I hope it will at your kitchen too.
Like Paula Deen says "I send you best dishes from my kitchen to yours".
God, I feel old now!

Crispy lentil fritters - Healthy Masala Vadai

Channa Dal (Split bengal gram/lentil) - 2 cups (If you don't have access to an Indian store to get this, then try "Bob's Red Mill" brand lentils)
Curry leaves - 10 leaves
Ginger - An inch
Garlic - 4 cloves
Red onion - 1 small finely chopped
Green chillies - 1 or 2 small
Rice flour - 2 tbsp
Cornstarch - 1 tbsp
Salt - To taste
Black pepper - 1/4 tsp
Cilantro - 1/4 cup finely chopped
Asafoetida (Hing) - An inch
Olive oil - 2 tbsp

Method:

Soak the lentils in water for about 2-3 hrs.

Preheat oven to 400F

Grind the ginger, garlic, hing, salt, pepper, and half the curry leaves till smooth.

Drain the water and add the lentils into the blender with no or very few drops of water and grind till coarse. I would "not" recommend grinding it to a smooth paste.

Add the red onions, rice flour, cornstarch, oil, green chillies, the remaining curry leaves (chopped) and cilantro and mix well. The batter should not be too thick or thin. At this point you can taste the batter to see if the salt and spice level is right.

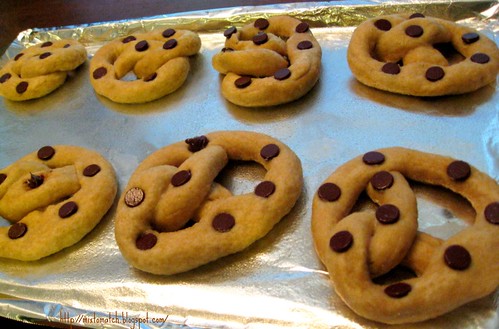
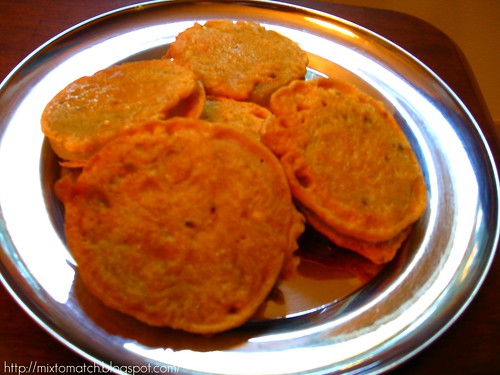
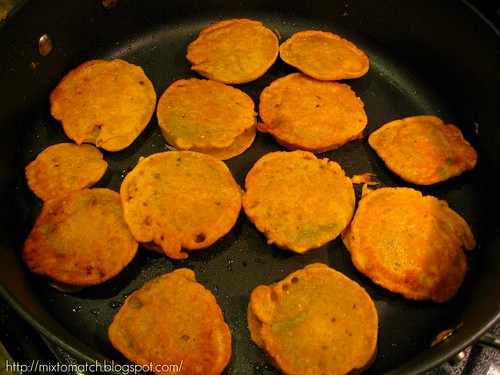
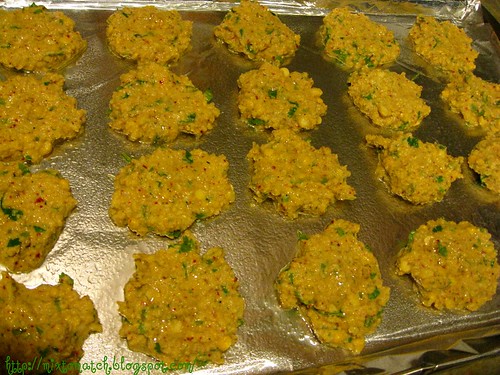
Spray a baking sheet with non-stick spray and spoon batter onto the sheet into little rounds as shown in the picture. It should be able to hold its shape, if it doesn't then it means you have added too much water.

IMG_1836

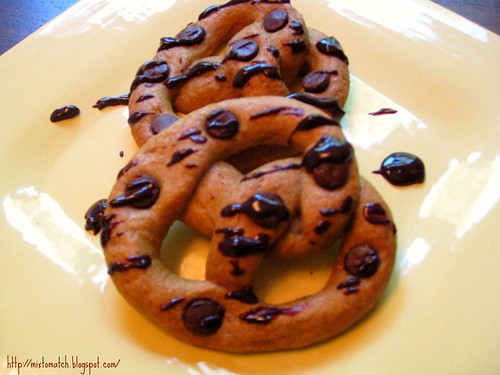
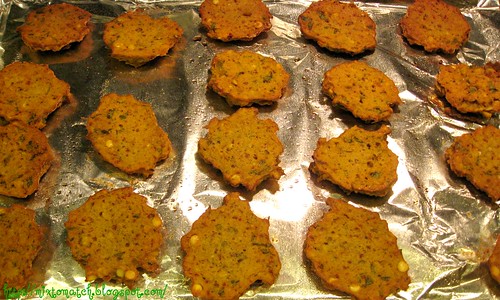
Bake for about 15 min, flip it and bake for another 10-15 min. It should be golden brown and crispy.

IMG_1838

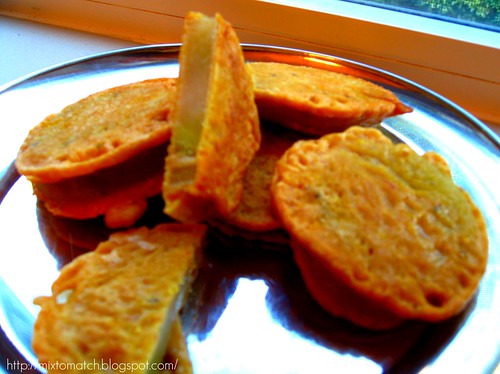
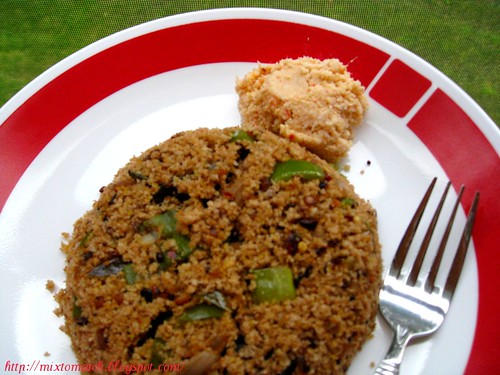
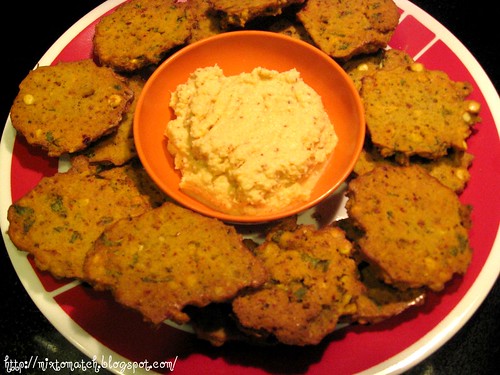
Let it rest for about 5 min and serve hot with chutney or relish it just like it is with a hot cup of chai/coffee.
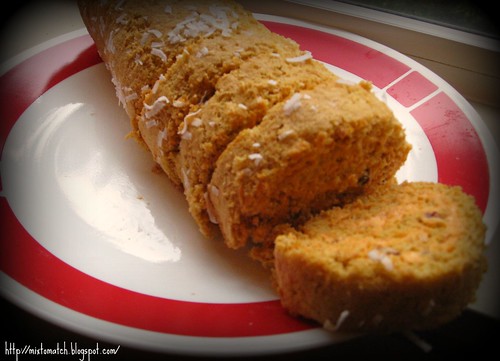
The fritters are upside down in the picture, I don't know what I was thinking!

IMG_1842

This goes to Divya's Diet foods event, Srivalli's Festival treats event, EC's WYF: Salad/Starter/Soups Event, Lore's Original recipe event, Hima's Sunday snacks event and Pallavi's Yummy Festival Feast - Diwali event

September 28, 2008

Eggplant in coco-peanut curry

first

eggplants

Many thanks to Curry Leaf for passing me the "Good job" award. I deeply appreciate it. And yes, I am passing it on today after a long time. And I am doing it in style! :p
I have written a one (well maybe two!) lines about the person who I am passing on the award to. I hope to follow this tradition each time I pass an award (don't beat me up if I don't!). I think it makes it more meaningful. What say?
So, if you are looking for the awards, scroll right down to the end of the post. But before that, may I interest you in my recipe? Please? Remember, I write a food blog? Hello?

This recipe landed from a picnic table onto my kitchen. I like gravies and curries, a lot, but sadly I don't make them as much as I would like to. One of my friends made it for a potluck picnic and all I heard was everybody rave about it. Now, I had to taste it myself to give it my verdict.
After spending a few minutes walking around the table and a few greedy glances later I ended up with my mouth stuffed with it, it was the best curry I had tasted in a long time. It was not that spicy and the medley of coconut and peanuts makes it one of the best curries I had discovered. My friend was gracious enough to share the recipe with me promptly, and many thanks to that, I am able to share it with you now.
What is more refreshing is that... it doesn't have that tomato base which graces every Indian curry/masala. Now, that is what I call a welcome change.

Eggplant in coco-peanut curry

Ingredients:

To saute Eggplants:
Eggplants/Brinjal - 6-8 medium
Salt - To taste
Turmeric - 1/4 tsp
Olive oil - 1 tbsp

For the curry:
Red onions - 2 medium
Red chillies - 4-5 depending on the heat level you prefer
Cumin seeds - 1/2 tbsp
Blanched peanuts - 2 cups
Grated fresh coconut - 1/2 cup
Sesame seeds - 3 tbsp
Turmeric - 1/4 tsp
Chilly powder - If you need more heat, add 1/2 tsp
Salt - To taste
Olive oil - 2 tbsp

Method:

Roast the eggplant in oil, as it starts to become tender, add the salt, turmeric and saute well. Set aside when done.

In the same pan, add oil, then add the cumin seeds.
Now add the red chillies, and the onions and saute till onions are translucent.
Set this aside as well.

Again, in the same pan, add peanuts to a tad bit of oil and saute till lightly golden.

saute

Now the assembly part.

In a blender, add the sauteed onion & red chillies, peanuts (cooled), coconut, sesame seeds and a pinch of salt and grind with a little water till it reaches a paste-like consistency.

masala

Take a tablespoon of oil in a pan, and add the paste and fry for about 5 to 10 min, just until it all comes together as one flavor.
Add turmeric and chilly powder to it, and saute for another couple of minutes.

Then add the eggplant, cover and let it cook on very low heat for about 10 minutes.

Your Eggplant in peanut and coconut curry is ready! It goes really well with plain rice or maybe even Mint chutney rotis.

last

Now, lets talk some "awards", shall we?


I would love to pass on the "Good Job" award to a few of my amazing fellow bloggers, in no particular order:

Suma Rajesh of Suma's Cuisine - I did try your microwave banana halwa. It was yum'o. It wasn't as pretty as yours as I did not shape them, but you get two thumbs up for ease and taste. Your recipe rocks!

Priya of Akshayapatram - You are one of the first blogs (what seems like so long ago) I came across and have looked up to when I was thinking of starting one of my own, I think I have mentioned this to you, haven't I? ;)

Rajeswari of Rak's Kitchen - I admire her way of clearly presenting the recipe. She lists every little procedure step-wise with pictures. Now, that is a lot of work, and she does it well.

Pearlsoffeast - I am still drooling over your chewy apricot and oats cookies. You did a great job with it, and the pictures in all of your posts is just incredible.

Madhuram of Eggless Cooking - She was the first blogger (apart from friends) who tried one of my recipes and gave me an encouraging feedback for it. Coming from her (being an awesome cook), I spent the rest of my day reeling in happiness.

Srikar's Kitchen - She is one of the first people to give a feedback on all of my posts most of the time, and I really appreciate it. That puts some pressure on you now, doesn't it? That is exactly what I am aiming for! He he he.

Rachel of Tangerine's kitchen- We happened to discover each other's blog only recently, but she has just inspired me with some really good dishes which I hope to make justice to some day :)

September 26, 2008

Oven-roasted Garlic Potato wedges - Vaccuming woes

first

One thing I desist doing is vacuuming. It is just a boring monotonous job and takes up so much time.
There are some of my friends who "actually", believe me... who like to vacuum the house. Yeah, they get pretty excited! Unfortunately I don't fall into that category.
Then the discovery of iRobot's "Roomba" happened, and named her (it???) "Nancy" (LOL) and it has been bliss ever since.
I would like to point out that I am not marketing this or any other product on my blog, I have been using this product for a couple of years and it just makes life so much more easier, so I decided to share the information here.
When there is a gadget out there that can actually make life simpler, why not use it.
It is available at all stores that carry good vacuum cleaners, I think even Costco carries it. They have different versions in the carpet cleaning robot, which is called the "Roomba", and the hardwood/tile cleaning robot is called the "Scooba" which actually preps, washes, scrubs and squeegees the floor. It even docks itself into the charger once it is done cleaning the house.
They have a lot more models, but my guess is that these are the commonly used household models. As usual, please do your research before considering any product. You can check out the iRobot website for more details.

To see the Roomba in action (videos):
http://www.youtube.com/watch?v=Qo5lPlG1Khw&feature=related
http://www.irobot.com/sp.cfm?pageid=122 (Click on "Watch Video" on your right)

As you go through the physically daunting task of imagining your home getting cleaned by the robot, I baked up a batch of Oven roasted potato wedges, my answer to those deep fried starchy wonders.
Why fry them when I can bake 'em?

Oven-roasted Garlic infused Potato wedges

Ingredients:

Russet baking potatoes - 4 large cut into wedges with skin (that is the part that gets really crispy)
Olive oil - 3-4 tsp
Garlic cloves - 4 halved
Black pepper - 1/4 tsp
Chilly powder - 1/4 tsp
Dried oregano - 1/4 tsp
Salt - To taste

Method:

Preheat oven to 425F.

In a large pot, add cold water and soak the potatoes with a little salt. (It is important to start the potatoes in cold water)

Bring it to a rolling boil. Turn down the heat to a simmer for 3-4 minutes. Not more than that.

Drain water and set potatoes aside.

In another pan, heat the olive oil, add the garlic and let it turn slightly brown. Remove garlic from the oil. Now add the black pepper, chilly powder, oregano, salt and turn off heat.

Add the partially boiled potatoes into the oil and toss well till coated with oil and spices.

Grease a baking sheet, and place potatoes in a single layer and bake at 425F for about 30 minutes or till golden brown and crispy.

Serve with tomato sauce, or light mayo.

last

Off to Hima's Sunday snack event

September 24, 2008

Chocolate chip Whole Wheat Pretzels - A plate to call my own

first

first 1

Wondering why I would call that plate my own? Because I made it... yes, I made the cute looking yellow dinner plate myself at a crafts center. Unfortunately, it is not something one can make at home. I would have filled the house with plates if only I could.

It basically involves some basic stuff, like the "slip" (which is liquid clay), I could have used the pottery wheel, but I am not an expert at it, so decided to go with liquid clay.
The slip is poured into a mold, as you clearly can see I used a square dinner plate model. And it sits for about two days in the mold.
Then the third day, the plate is unmolded, it is still slightly wet, and then it is fired under very high temperature.
Next comes the paint, I chose lemon yellow.
You see... I was working on a theme here with lemon, lime and cantaloupe colors (basically light yellow, lime green and light orange) for a dinner set.
So after painting with the desired color, it is again fired to set the colors, then glazed (to give that glossy finish to the plate) and again fired. Lot of repetitions, yes...
It is a long process, but it sure is satisfying to eat from a plate that you made with your own hands. To call it your very own.

Slight shift in focus, away from the plate, and to what is on it today. Chocolate chip good-for-you pretzels made with white whole wheat flour. I like the regular cinnamon sugar pretzels a lot, but what fun would it be to make the same at home?
So I deviated a little from sugar to chocolate, still keeping it in the sweet category though! It is best eaten hot from the oven. So big batches are not advisable. I have given a little note about the yeast used in the ingredient list. So, keep an eye out for it. Other than that, we are all set to dive into the recipe.

Chocolate chip Whole Wheat Pretzels

Ingredients:

Method:

White Whole wheat flour - 1 1/2 cups
Butter - 2 tbsp at room temperature
Instant Yeast - 1 tsp (I used the rapid rise, highly active kind), this did not require adding water to activate it. If you are using the normal yeast, then you may have to let it sit in warm water for a few minutes before kneading it in with the flour, or follow package instructions.)
Sugar - 1 tsp
Salt - 1/2 tsp
Water - To knead
Chocolate chips - A handful
Water - 4 cups
Baking soda - 2 tsp

Method:

Preheat oven to 400F.

Mix the flour with the yeast, butter, salt and sugar and knead with just enough water to form a elastic ball. You may have to knead for at least 10-15 minutes or until smooth.

Cover with a cloth and let it rise for an hour or two, till it doubles in size.

Once it has doubled, then punch down and knead again for another 5 minutes. Make 8-10 equal sized balls and let it sit for 15 minutes.

Meanwhile, bring the 4 cups of water and the 2 tsp of baking soda to a boil in a pot.
Then turn down to medium heat.

Then take one ball of dough and form it into a rope using the palm of your hands, in a rubbing motion.
Form into a long rope, at least 15 inches in length, and shape into a pretzel knot.
Make pretzel shapes with all the remaining dough.

knot

Grease a baking sheet and set aside.

Drop the pretzels, two to three at a time gently into the hot water on medium heat. Let them boil for one minute on each side.

boil

Gently transfer onto the baking sheet one by one.

Now insert the chocolate chips around the pretzel and gently press in so it does not fall apart.

bake

Bake for 10-15 minutes at 400F or until lightly browned on top.

Remove and let cool for about a couple of minutes on a cooling rack.

Top with chocolate sauce and serve hot. Cold pretzels don't taste good in my opinion. So enjoy them fresh and hot from the oven.

last

September 23, 2008

Carrot cake roll with low-fat cream cheese filling

last

I was planning to do this post yesterday, and I ended up pushing it as you can see till now. Do you ever experience those days when you don't feel like cooking or blogging or for that matter, even thinking about food? That is exactly where I was.
I was even contemplating doing a one line write-up which I finally decided against in the best interest of this blog and my readers. How boring would that have been?

I don't know where or what I was looking up for inspiration, but I ended up watching this Tamil movie "Kuselan" with Rajinikanth in it (time that I was supposed to blog.) Not a very good idea. There was about 20 min of story in the whole 3 hour movie.
Like somebody had done a post in a hurry! Exactly what I was working against.
I watched the movie in like an hour, I just had to run through most parts of it, and I did not miss a thing. I regretted not cooking or blogging by the time it was over! It seemed a much more inviting alternative at the end of all this.

That is exactly how I end up sharing these cute looking carrot rolls filled with low-fat cream cheese frosting.
My last post was a savory carrot muffin, and now I have baked up a sweet carrot cake roll. I know, it is a lot of carrots in one week, but I really do like them, next only to the bunnies.
I have adapted this recipe from "cdkitchen" with very few changes.
I tried to color the cream cheese filling with a nice light orange but it turned against me. I used whole wheat pastry flour and it kinda blended in with that color. So the nice twirls may not be that clear in my picture. So if you plan to make this, just leave the cream cheese to its natural color. So, that way it gives a nice contrast against the cake.
So here it is...

Carrot cake roll with low-fat cream cheese filling

Ingredients:

Whole wheat pastry flour - 2/3 cup
Cornstarch - 2 tbsp
Baking powder - 1/2 tsp
Cinnamon - 1/2 tsp
Eggs- 3 separated
Honey - 1/2 cup
Vanilla extract - 1/2 tsp
Grated carrots - 1 cup loosely packed
Cream of tartar - 1/4 tsp

Cream cheese filling:

Low-fat Cream cheese - 8 oz tub
Honey - 2 tbsp
Vanilla extract - 1/2 tsp
Chopped raisins - 1/2 cup
Coconut flakes - 2 tbsp

Method:

Filling: In a mixing bowl, with a help of a hand blender beat the cream cheese until fluffy. Next add the honey, vanilla extract, raisins and coconut. Set aside.

Cake: Preheat oven to 350 degrees F.

Line a jellyroll pan with wax paper. And grease.

Mix together the flour, cornstarch, baking powder and cinnamon.

Beat the egg yolks with a hand blender until light, creamy and till the volume increases. Mix in the honey and vanilla.

Toss in the dry ingredients just until incorporated. Do not over mix.

With a rubber spatula, fold in the grated carrots.

In a bowl, beat egg whites with cream of tartar till it forms stiff peaks.

Stir about 1/4 of egg whites into batter first, then fold in the rest. Pour batter into pan. Bake for 12 to 15 minutes or till done.


Sprinkle a towel with coconut flakes. Loosen cake and turn onto towel, peel off wax paper. Roll cake up in towel and let stand for 1 minute.

Unroll and let stand for 3 minutes, then roll up and let stand until cool. Unroll cake, remove towel. I guess this process kind of gives the flexibility to the cake in itself.

Spread with filling right to edges of the cake.


Re-roll cake.
Let the log sit for a few minutes, and then cut into one inch thick slices and serve.

first

This is off to Ruth's Bookmarked event

September 21, 2008

Savoury Carrot Coriander muffins

first

first 1

Sweet... chocolaty... fruity... can one imagine beyond that about a humble muffin?

In fact, muffins and sweet are the only two words I thought would/should/can/will go together... until the inevitable happened.
Being a foodie, I can't afford to be closed to the idea of change, can I?

You might call this my debutante effort... the first time I baked a set of savoury muffins. I was at first weirded out by the fact that muffins could be savoury until I came across Lakshmi's recipe at her blog. It was simple and doable, with carrots and coriander which I happen to like to work with a lot. There are some variations from the original recipe, as in, I have used whole wheat pastry flour in place of all-purpose flour, which does change the texture a bit, and in my excitement as to how the muffins would turn out, I missed adding the yogurt which was one of the ingredients.
Nevertheless, the muffins turned out nicely, wonder if the yogurt would have made it softer and better. Will find out the next time around. But I have not missed that in my recipe below, so people who decide to try it out, don't miss it out like me.
Nutmeg is an additional spice I used for the sake of aroma and flavor. It is just one of those spices, that makes everything better including these muffins.

middle

Savoury Carrot Coriander muffins

Ingredients:

Whole wheat pastry flour - 1 cup
Carrots - 1 cup grated finely
Coriander - 1/2 cup chopped
Nutmeg - A pinch or two, freshly grated
Freshly ground black pepper - 1 tsp
Plain yogurt - 1 tbsp
Tomatoes - 1/2 cup pureed
Skim milk - 3/4 cup
Baking Powder - 1 tsp
Baking Soda - 1/2 tsp
Salt - To taste
Olive Oil - 1 tbsp

Method:

Preheat oven to 375F.

Mix the whole wheat pastry flour, nutmeg, baking soda, baking powder, pepper and salt together.

Add the oil, tomato puree and milk and mix just until incorporated. Do not over mix.
Add yogurt and mix.

With a spatula, slowly mix in the coriander and carrots.

Spoon batter into a greased muffin tin up to 3/4ths of the way up.

Bake for about 20-30 minutes or until golden brown on top. I would keep checking after 15 minutes just to make sure. Try not to open the oven door while baking.

Allow to cool and enjoy your savory muffins with or without your favorite chutney drizzled on top.

last

Baked off for Ruth's Bookmarked event
and Siri's Herb Mania - Cilantro/Coriander event

Pavani has tagged me for "Six spectacular quirks about me"
Rules of this tag are:

1. Link back to the person who tagged you.
2. Mention the rules on your blog.
3. Tell about 6 unspectacular quirks of yours.
4. Tag 6 following bloggers by linking them.
5. Leave a comment on each of the tagged blogger’s blogs letting them know they’ve been tagged.

Being a quirk who happens to write a food blog, I am going to list those related to food for now.

* As though me eating weird/bad food wasn't enough, I generously offer it to the person sitting next to me. "Here try this, it tastes weird!!!" Oh yeah, and I have that face when I say it...

* I got to check my blog every now and then to see if it is hale and healthy.

* Like to cook in a spanking clean kitchen every single time. Sometimes I end up more time cleaning than cooking.

* I fantasize myself drinking a "cup of coffee".
Fantasize because... I don't drink coffee or tea or any kind of hot beverage. Somehow the "cup of coffee" doesn't appeal as much in reality.

* I discard tomatoes from a sandwich/burger everytime I eat one.

* I cook some mean dishes which turn out the best when I am angry or upset over something.

Now that I have bared my soul, the six people I tag are:

Srimathi http://www.fewminutewonders.com/
Ivy http://kopiaste.org/
Usha http://veginspirations.blogspot.com/
Nick http://www.peanutbutterboy.com/
Lore http://culinarty.sapiensworks.com/
Cham http://spice-club.blogspot.com/

Have fun!

September 19, 2008

Ginger and Orange Tofu Pudding

first

How many times have I cut my finger while prepping food, the count is tipping over, I don't even want to remember. I am sure this is a tale of woe that I share with a lot of you.
I have tried the Rachel Ray's tip of curling the fingers in while holding the vegetable or fruit or whatever. Didn't work. Somehow the fingers seems to stretch out every now and then. And right at the nick of time the knife finds the finger. Ouch!
I have tried the finger guard, I require a whale of a motivation to make me wear that piece of silicone. It just seems to come in the way of the finger and the knife. (That is the whole point, duh! I know... but somehow my fingers don't seem to like it)
Finally, I am realizing that I don't have the proper knife skills. I use a chef's knife, but lack the technique.
They recommend using a really sharp knife. As weird as it may sound, it is apparently the key to not cutting your fingers... the argument being dull knives slide down the surface and instead of cutting the vegetable/fruit, they end up cutting the finger. Makes sense to me.
Secondly, keep the fingers as far away from the knife as possible when holding the veggies.
Thirdly, use a sliding movement and use as little pressure as possible, and let the sharp knife do the work for you.
And last, cut waxy vegetables from the inside so the knife gets a better grip on the surface.

And why am I talking about such a boring subject now, no reason... this recipe does not involve a knife, and I am glad!

Let us dish it out now... The combination of ginger, orange and tofu together has been one of my favorite in side dishes, noodles or rice dishes that is served in Asian restaurants.
I have tried to take those three distinct flavors and marry them together in a dessert this time around. It is simple, quick and has a unique taste. If you are apprehensive about it, make it in small quantities first to see if the taste and texture is something your taste buds enjoy.

Ginger and Orange Tofu Pudding

Ingredients:

Silken tofu - 1 pack
Whipping cream - 2 tbsp
Orange zest - 1/2 tsp
Ginger - 1/4 tsp (finely grated or ground)
Molasses - 3-4 tbsp (Adjust according to taste)
Vanilla essence - 1/4 tsp
Ginger snaps/cookies - 1 cup broken into smaller pieces

Method:

Beat the whipping cream with a hand blender till fluffy. Then add the already smoothed out tofu and mix till creamy.

Now add the orange zest, ginger, molasses and vanilla and mix just until incorporated.

Add the tofu pudding and crushed ginger cookies alternating in a serving bowl or glass cup.

Top with a little orange zest and cookies on top.

last

This goes to Lore's Original recipe event

September 17, 2008

Fat-free Chocolate Pistachio Roll

Chocolate Pista Roll

Lately, my readers have been intimidating me! I was thinking they were being courteous when saying that they will "try it out" soon, but they are actually trying out the recipes that I put out on my blog! :p
Overall, I have received postitive feedback and that makes any blogger happy, especially for someone like me who has been blogging only for the past couple of months seriously. So, I am not complaining!

Hop back to the recipe, shall we?
This dessert is a modification on Tarla Dalal's recipe and I made it low in calories.
I could not find low-fat or fat-free khoya anywhere (if you have come across it, pls enlighten me), so I decided to make my own. Trendy aren't we?

Anyway, the rolls were so pretty to look at... the brown and the green with little specks of nuts. And what was even better was eating them.
I could eat desserts day in and day out. I have a gigantic sweet tooth, but the verdict has nothing to do with ;) I promise!

Fat-free Chocolate Pistachio Roll

Ingredients:

For Khoya:
Mix 2 cups of fat-free Ricotta cheese with about 2.5 cups of Non-fat dry milk powder in a non stick pan on medium heat. Keep stirring every now and then till it forms a nice homogenous mass. All the water from the ricotta should be absorbed, and you will be left with a nice doughy mixture.

For the rolls:

1 cup - Fat-free khoya (Recipe above, since it is not readily available in the market)
1/4 cup - Powdered sugar
1 tsp - Cocoa powder
2 tbsp - Chopped pistachios
1/4 tsp - Vanilla essence

Method:

Cook the khoya and powdered sugar in a non-stick pan on slow flame, while stirring continuously till the sugar has dissolved and the moisture has evaporated.
This would take about ten to fifteen minutes.

Cool, add the vanilla essence and mix well. Divide into 2 equal portions.

In one portion, add the cocoa powder and mix till combined. Roll (with the help of a rolling pin) into a rectangle of 1/4" thickness and set aside. I roll it on a wax paper to prevent it from sticking.

In the other portion, add the chopped pistachios and mix well, it will turn green from the pistachios, or you could add permitted cake coloring to make it more attractive.

Make the pistachio cylinder equal to the length of the chocolate rectangle, but it should be only wide enough so that the chocolate rectangle can be wrapped around it.

Place the pistachio roll on the chocolate rectangle and wrap so that the chocolate rectangle covers the pistachio roll evenly from all sides. Seams should not be visible. If crack forms, then roll the cylinder back and forth till it becomes smooth.

Wrap the roll in a plastic sheet/wax paper and refrigerate till firm, about 15-20 minutes.

Remove the plastic sheet/wax paper and cut into 1/2" slices & serve.

I am rolling it off to :
Sangeeth's Eat Healthy - CALCIUM Rich Contest - It has more than 2 cups of Non-fat dry milk powder.
Sunshinemom's FIC Green event - For obvious reasons, being green.
Nags The Saas Bahu Aur Sensex Contest - I kind of like to think as Saas and Bahu as the two complimentary colors in the healthy dessert but they are gelled together as one. I am patting myself for that piece of impromptu-creative-bull I came up with.
You can find the movie's website here

September 16, 2008

Fried green tomatoes - Goes Indian!

First
Tomatoes

Of course this is not fried! ... so those of you who came looking for some unhealthy greasy "bajji" stuff on my blog, bummer!
If you read on, I might have a chance to explain how this is done, and how it does not compromise on taste at all (if you have tasted the original FGT, if not... don't even bother thinking about originality!)

I didn't know what to do with Green tomatoes, I was so not looking for them.
I stumbled upon them at a local farm, picked them from a little vine thinking it would turn red one fine day. The worst part... I stashed it in the fridge and it never did!
A little rewind... after I picked the tomatoes the girl at the counter looks at me perplexed, and asks me what I was going to do with green tomatoes. (Psst... I am thinking she wanted to share the knowledge that she had about those greenies)
And clueless as I was, I bluntly replied that I had no idea. That was all she needed, and she started to explain how I could pickle them (pickle as in vinegar pickle, not the Indian one), or I could make fried green tomatoes.
I with my new found knowledge, humbly tugged my bag and left. Oh yeah, I paid her.

I am not that big on pickling things with vinegar. So, I was pretty much stuck with fried green tomatoes.
Another crisis, frying! That is not going to happen now, is it?
And there was born the idea of just pan frying them with a little oil. The end result was something I had never tasted before, very interesting texture and flavor with the tomatoes, and all in all it was a wonderful snack.
Since it was not deep fried, the tomato slices kind of has a sandwiched effect. Very pretty to look at.

Disclaimer:) I am not against fried food. I believe that anything in moderation is the way to go, but moderating unhealthy food everyday might become challenging, and hence I try to reserve the fried goodies for once-in-a-while.


Fried green tomatoes

Green tomatoes - 3 medium
Cornmeal flour - 1 cup (the regular cornmeal is coarse and making a batter out of it would be difficult)
Chick pea flour (Besan) - 2 cups
Rice flour - 1/2 cup
Salt - To taste
Pepper - 1/2 tsp
Hing/Asafoetida - A pinch
Chilly powder - 1/2 tsp
Water - To bring the batter together
Light olive oil - A few tablespoons as and when you need it (Remember we are not frying it)

Method:

Slice the raw green tomatoes into half-inch thick slices.

In a mixing bowl, add all the rest of the ingredients with a little water and make it into a nice not too thick/thin batter.

In a non stick pan, bring about 2-3 tbsp of oil to medium-high heat.

Dunk in the slices one by one into the batter, and drop them in the pan. You can see how much oil I have used in the picture below.

When one side is golden brown, flip to the other side and add oil "if" needed.

When it is done, lift off the pan, and let it cool and serve.

In pan last
Last
This is off to EasyCraft's WYF: Salad/Starter/Soups Event
And Lore's Original recipe event

September 14, 2008

Oats dosai - Or just call 'em crispy crepes

first

This has become a staple breakfast for a long time now. No grinding, no prepping for the batter. No fussing around!
I am calling them crispy crepes because they are super-crispy and for readers who might not be familiar with dosais. But it is is our very own plain old dosais with lots of Oats to add to the health factor.
I was never a fan of oats as a breakfast. I could never bring myself to eat the bowl of gooey stuff. Nothing bad with it, but just not the way I liked it.

Have you ever thought about how girls with curly hair always want straight hair and vice versa? Poor analogy, but I am trying okay?
I was under that spell too, but only it was for oats... if it is sticky and wet, I wanted it crispy and flavorful. And here it is... just the way I promised it.

Oats dosai/crispy crepe

Ingredients:

Quick oats - 2 cups
Whole wheat flour / Atta - 1/2 cup
Rice flour - 3 tbsp
Roasted sooji/rava - 1/2 cup
Cumin seeds - 1tbsp
Green chillies - 1 large (chopped finely)
Curry leaves - A sprig (chopped finely)
Salt - To taste
Water - As required
Oil - As required

Method:

Crush cumin seeds between palm of hands to release flavor.

Mix all the above ingredients with water to make it thinner than dosai batter consistency. A little thicker than whole milk consistency. Yes, that is how you get them crispy.

Heat a nonstick pan with a flat base on medium-high flame.

Pour the batter and spread it from outside to the center with a ladle as you would for a normal rava dosai.

Cook on both sides with a little oil. Serve hot with chutney/sambar etc.

Goes to Suganya's JFI – Oct ’08 – Whole Grains event
and
Aparna's WBB: "Grains in my Breakfast" event


September 13, 2008

Wholesome Bread Upma with Anaheim chillies

IMG_1935

How does an Indian bread upma sound with a fiery Mexican twist?
First a little literature for those who are not familiar with "Upma". It is an Indian dish made of either cream of wheat, rice, vermicilli, cous-cous, or our very own stale (that which has lost freshness) bread.

It originated from the word "Uppu" meaning salt, and "Maavu" meaning flour (of any kind). I know it kind of sounds way too simplistic, but trust me... the name does not do justice to the dish. Sometimes it is even ridiculed for the simplicity of the dish!
It has a healthy amount of vegetables which depends on what the person who is making wants to add. So, it is a pretty flexible dish to prepare.

I am a big fan of anything spicy, so I have chosen a particular type of chilly for this which you may or may not be familiar... Anaheim peppers.
Anaheim peppers are stuffed or very often used in salsa, and refers to a milder variety of New mexican chili peppers. They can be bought fresh or canned. For this dish I prefer the fresh ones. You may want to remove the seeds if you cant take too much heat.

As far as the bread goes, I used the flourless whole wheat bread which is made from sprouted whole grains, you can find this in the speciality bread section of your grocery store or at Costco.

Wholesome Bread Upma

Ingredients:

Whole wheat flourless bread - 10-12 slices
Anaheim peppers - 3 medium (they are about 4-6 inches in length)
Red Onions - 1 medium diced
Ginger root - An inch finely chopped
Mustard seeds - 1 tbsp
Urad dal - 1 tbsp (for seasoning only)
Curry leaves - A few
Salt - To taste
Ground black pepper - 1 tbsp
Light Olive oil - 2 tbsp

Method:

You may or may not want to take the corners off the bread slices. It does not matter either way.
Break it up into pieces and pulse them in a blender or food processor till you get soft crumbs. No big pieces.

In a pan, heat the oil and add mustard seeds, urad dal, ginger and curry leaves till the seeds start to splutter.

Add the onions and saute till translucent. Then add the Anaheim peppers (chopped) and saute for another few minutes till it is tender.

Add the bread crumbs, salt, pepper, and toss everything together, and let it cook for another 10-15 minutes in order to let the bread absorb all the flavors.
If it is too dry, you may sprinkle a little water. But this is not neccessary.

IMG_1889

Garnish with some chopped cilantro and serve hot with coconut chutney.

IMG_1924

Since the bread is made from flourless and sprouted whole grains, I am sending this off to Suganya's JFI – Oct ’08 – Whole Grains event and Aparna's WBB: "Grains in my Breakfast" event


September 11, 2008

Roasted Garlic Challah Bread

first

Just when I was writing another post, a thought came to my mind... If I am so self-absorbed creating and making my own recipes and posting them for others to read... then who actually tries the sea of recipes that others write or so painstakingly make? I am sure this has crossed many of your minds.
A lot of recipes are just brilliant, and so unique. It would be a shame not to make and taste them myself.
So, from now on I am making a point to try out some of the recipes that others have tried and tested.
And obviously, since I write mostly about healthy food. I am trying to find the same genre recipes.

This is one such recipe by Vaishali of "Holycow", who is a vegan cook and and made this bread with an egg substitute. Flax seeds is something I use very regularly, and so didn't think twice about making it. They are about one of the most healthful stuff you can find with high levels of Omega-3 fatty acids.

And needless to say, knowing me... I did make some changes here and there, adjusted it according to my taste and came up with a flavored Challah bread infused with roasted garlic. I did not have much time to make the bread since I started later in the day, so I had to use a slightly different method. It turned out to be the most comforting thing I had in a long time.
Bliss...

Roasted Garlic Challah Bread

Ingredients:

Highly active Rapid rise yeast (Dry) - 1 package
Whole wheat pastry flour - 2.5 cups
All purpose flour - 1/2 cup
Flax seeds - 4 tbsp (ground and mixed with water)
Olive oil - 3 tbsp
Roasted Garlic - 3 tbsp (chopped finely)
Sugar - 2 tbsp
Salt - To taste (about 1 tsp)
Skim Milk - A little to knead

Method:

Mix the yeast, flour, olive oil, sugar and salt with bare hands.

Add the flax seeds paste and roasted garlic and form a ball adding a splash of milk as and when needed.

Knead for about 20-25 minutes by hand (a good workout!) pushing and pulling the dough. The more you knead the better it is.

Once the kneading process is done and the dough is smooth, transfer the dough ball into a large container and toss it with a teaspoon of oil just to coat.

Cover with plastic wrap and leave it in a warm place for about 2 hrs or till the the dough doubles in size. You will know when it is done.


Punch the dough with your fists slightly and knead it for another 5 minutes or so.

Divide the dough into 3 equally sized balls and let it rest for another 30 minutes. Covered with a plastic wrap or kitchen towel.

At this point, pre-heat your oven to 375F.

Take each ball and roll with your hands to form ropes about 12-14 inches in length.


Place the ropes on a baking sheet sprayed with oil spray (or dust with cornmeal which I did not have) and press the top end together.
Start plaiting/braiding it as you would style your hair.
Seal the bottom edges together.


Spray with olive oil and sprinkle with some black sesame seeds.

Bake the bread for about 30 min or until golden brown on top.

Let rest for about 20 min. Slice and serve with warm seasoned olive oil.

last

This is wrapped and sent to Ruth's Bookmarked Recipes event


And to Aparna's WBB: Grains in my Breakfast event