November 30, 2008

Ricotta Chocolate Fudgy Wedges - Not a speck of flour

first

last

For those who have been wondering where I have been for the last week... I happened to take a small trip for the holidays and now I am back :)
So, if it is not too late, Happy Thanksgiving!
My last post was about plagiarism experienced by another blogger, and now it seems to have been solved. Or at least I hope it is entirely.
One thing I learned through all this was, it is important for us to keep an eye out for other bloggers, notify them of pictures/content that have been used without giving due credit of without prior permission (if you come across any that is.)
You never know when it might happen to you, and at that time, you will have to reach out for help.
I tried to do my part, and I am happy about it.

Necessity is the mother of all invention; necessity being the dire need to use up leftover Ricotta cheese from making Fatfree Rasamalai, and the invention being these chocolatey, fudgy wedges. What is not to like with chocolate and fudge going in the same sentence?
Oh, and did I mention that it was fat-free?
This is one of my own inventions, and I am pretty content. This is not a firm wedge, it is soft delicate and needs a fork or spoon.
No flour has been used in this recipe, so this would be perfect for people with wheat/any kind of flour intolerance.
Please remember that this does have dairy and nuts.

It is best served chilled and tastes even better the next day.

Ricotta Chocolate Fudgy Wedges

Ingredients:

Fatfree/Lowfat Ricotta Cheese - 3 cups
Nonfat Milk Powder - 1 to 2 cups
Sugar - 1/2 cup or to taste
Semi Sweet Chocolate chips - 1 cup (or more for prominent chocolate flavor)
Vanilla essence - 1 tsp
Nuts & Chocolate chips - To garnish

Method:

In a non-stick pan, heat ricotta cheese and sugar on medium heat till the water evaporates.
Add the milk powder and mix well till the mixture thickens.

You should be able to form a ball with your hands.

Melt chocolate chips in a microwave and add it to the ricotta mixture.
Add vanilla essence.

Still well until combined.

Remove from heat and transfer into a round greased tray.

Let it cool. Cut into wedges and sprinkle with nuts and chocolate chips and serve cold.
Tastes even better the next day.

first 1

November 24, 2008

Cutlets wrapped in Roasted Eggplant blankets - Fight against plagiarism

last

What kind of person steals others hard work and take credit?
There have been many a bloggers who have been victims of plagiarism and just completely fell off the blogging world.
Writing a food blog is a lot of hard work, and almost becomes an extended part of oneself. In some cases, we look for some kind of a creative outlet through this work.
Cooking, taking pictures, in many cases coming up with your own recipe is not easy. And bringing it all together in a cohesive manner is even more tougher.
Malar Gandhi of "Kitchen Tantra" has been a recent victim of plagiarism, and has voiced her concerns in her post.
So please voice out your support to her and many others. This could happen to any of us.
Leaving comments and appreciating ones work is not only what we food bloggers are here for.
And if you have any suggestions about how to deal with this issue, please leave your comments on Malar's blog.

Support, and let the world know that we won't let our fellow blogger(s) down.
Voice it out, and voice it out loud.
Probably as big as this Eggplant!

brinjal

Keeping today's recipe simple...
Remember my Garbanzo and Potato cutlet?
This is just kicking it up a notch, making it look pretty and what not...
Would be a perfect appetizer for a party and fun events.

Cutlets wrapped in Roasted Eggplant blankets

Ingredients:

Garbanzo Cutlets

Large Eggplant - 1
Salt - To taste
Pepper - To sprinkle
Olive oil - To roast eggplant slices

Method:

Make the Garbanzo cutlets and set aside.

First

Preheat oven to 400 F.

Slice the Eggplant into thin slices lengthwise.

Heat oil in a large flat griddle.

Lay on the eggplant slices and sprinkle salt and pepper on both sides and cook till soft.

slices

Wrap the cutlets in the roasted eggplant slices and seal it with a toothpick.

Bake until lightly brown and crispy.

bake

Remove and serve along with tomato sauce or chutney/dip.

Works well as an appetizer.

first

November 21, 2008

Cranberry Pickle - Taureans and reds

first 1

first
I know, this picture above is a little blurry, but I couldn't resist posting it. The red on the green background... just adored the combination.

"Are you a Taurean? They stay away from red. Red infuriates the "bull.""
Ever heard that before?
It was in a "Sun Signs" book (the author I don't remember, but it was a fairly well-known book, and it is pretty old too) that held my attention for a long time. This sounds very amusing to me at the moment, I am a Taurean and I love red!
Either the advise was wrong, or I am just plain different.
Red is the reason (though not the only reason)I can't keep my hands off this one pickle. And no, this red does not make me charge :)

This is the Indian pickle. Not the kind soaked in vinegar. Very small quantities (because it is very hot) can be used as a side dish in a sober meal. I personally prefer to pair it with rice mixed with yogurt. Commonly referred to as the "Curd rice".

Select nice bright red cranberries for this pickle. Fresher the better. You can test its freshness by throwing a berry on the kitchen counter, if it bounces back (like a ball), then it is pretty fresh. The ones that don't may have been sitting at your grocer's for a little too long. I recommend using the freshest ones for this pickle. It does make a difference. Cranberries initially start out as white berries and turn red as they ripen on the plant. And are a decent source of antioxidants.

These look like little rubies, don't they?

cranberry

Cranberry Pickle

Ingredients:

Fresh cranberries - 3-4 cups
Red chilly powder - 1 cup (Please adjust the heat level according to your taste)
Salt - To taste (It is a pickle, so it needs more than a regular dish)
Mustard seeds - 2 tbsp
Asafoetida/Hing - 1/2 tsp
Fenugreek seeds powder - 2 pinches
Olive Oil - 3/4 cup

Method:

Heat oil in a small pan. When it is warm, add mustard seeds.

After they splutter add the Asafoetida.

Immediately add the cranberries, red chilly powder, salt and mix well on medium heat.

saute

Saute till the berries start to pop open. About 10 minutes. Do not let all of them to pop, they will turn mushy. You should be able to see some whole cranberries.
That is what makes it interesting.

Turn off heat, add the fenugreek seed powder and mix well.

Cool and store in an air-tight container for a week at room temperature. Or store them in the refrigerator for later use. Mine stays nicely for a month or two.

last 1

last

November 18, 2008

Garlic and Red chilly Naan/Flatbread - Oven method

first

first 1

Among all the breads I have posted here, not one is an Indian flatbread (excluding the "chapathis" of course!)
This is where that leaves me... this time staying close to my natural abilities, and came up with my own version of "Naan" which is fondly referred to as the Indian flatbread.
The flour used in this recipe is "Atta", a whole wheat stone-ground flour (Or you may just use the regular whole wheat flour.)
If you are close to an Indian store, try to grab a small bag of this (Atta). They do have heavyweights like the 20lbs. bags! But if you are new to these kinds of breads you may not end up using all of it, so in this case smaller is in fact better! :)

Dried red chillies add a hot zing with the garlicky flavor complementing it perfectly. Being my own creation, I did go a little high on the heat levels, but the recipe listed below uses a saner amount of chillies.

A small tip about removing garlic smell from your hands after peeling them... rub your fingers over a stainless steel spoon keeping both spoon and hands under flowing water. This will remove the stubborn smell from your fingers and prevent it from getting onto other food that you maybe multi-tasking with. Works for me!

And again, this is an oven version of the flatbread, I will be posting other methods of making them sooner or later. This is my first attempt at Naan and I just hope it will get better from now on. Keeping my fingers crossed!

Garlic and Red chilly Naan/Flatbread

Ingredients:

Atta/Whole wheat flour - 3 1/2 cups
All purpose flour - 1/2 cup
Yeast - 2 tsp
Warm water - 1/4 cup
Sugar - 1/2 tsp
Garlic - 4 cloves
Crushed dried red chillies - 4-5 (Depending on how much heat you can take)
Salt - To Taste
Olive oil - 3 tbsp + a little for brushing on top of the bread.
Water - To knead bread

Method:

Chop and roast the garlic along with dried red chillies in a small pan with olive oil. Set aside.

Add the warm water to the yeast, add sugar, mix well, and let it sit till frothy (about 10 min)

Mix flour and salt, add the yeast mixture, garlic and red chilly flakes and add water enough to form into a not-so-tight ball.

Knead this dough ball for about 15 min to develop the gluten and it should be smooth when you are done.

before rise

Coat with a tad bit of oil, cover and let it rest in a large bowl for about 2 hours. The dough will expand.

After a couple of hours, the dough will look like this.

after rise

Preheat oven to 425F.

Take it out on a floured board and fold over for about 4 to 5 times and pinch out large lemon-sized balls and roll it out with the help of a rolling pin or just use your hands to spread it out like a pizza dough.

Place on a baking stone or sheet, and bake for about 10-15 min or till it is brown on top.
Brush with olive oil/butter as it comes out of the oven.

Enjoy warm with your choice of vegetables and yogurt to make a nice balanced meal. Or make it extra special with rich gravies.

last

last 1

Sending it off to Susan's Wild Yeast Spotting event

November 17, 2008

Low fat Banana Brownie Pizza - Sensual yet casual

first

Would like to thank firstly all those people who thought my blog and its content was worthy of awards. Thanks everyone, and will get around to passing it soon.

Care for some dessert pizza with chocolate and bananas?

I have had some questions about whole wheat pastry flour recently, to answer those in short, you can find this is the flour aisle (or the speciality flour aisle) in the grocery store (in the US), or in the bulk section of the health food store. I am not sure about the availability in other countries.
They are a finer and lighter than the regular whole wheat flour, and can be used as healthier substitute for all purpose flour in cakes, cookies and brownies such as these. Sifting the flour gives a airier texture and feel to the end product, though not completely necessary.

Another point to note (like I have already mentioned) when making brownies, is not to use a hand mixer of any kind. Brownies are dense and chewy, unlike the cakes which are lighter. Using a hand mixer will only incorporate air into it which won't make for a perfect brownie.

Bananas in the batter add a light fruity aroma and taste to it, and with chocolate is it just the perfect sensual yet casual dessert pizza one could ask for.

first 1

Low fat Banana Brownie Pizza

For the banana brownie layer:

Whole wheat pastry flour - 1 cup
Melted semi sweet chocolate chips - 1/4 cup
Unsweetened cocoa - 1/4 cup
Nonfat dry milk powder - 1/4 cup
Baking soda - 1/4 tsp
Ripe banana - 1 large
Sugar - 1/2 cup
Egg - 1 large
Buttermilk - 1/4 cup
Vanilla extract - 1 tbsp

For topping:

Bananas - Sliced
Heavy whipping cream - Whipped and chilled
Agave nectar - To drizzle

Method:

Preheat oven to 350F.
Grease a round cake tin and set aside.

Mix all the dry ingredients, whole wheat pastry flour, cocoa, milk powder and baking soda in a bowl.

In a food processor, combine banana, melted chocolate chips, sugar, egg, buttermilk, and vanilla till smooth.

Whisk in the dry ingredients into the wet mixture just until combined, do not over mix.

Bake at 350F for 20-25 min or until toothpick comes out clean when inserted in the center. Do not over bake.

Allow to cool completely. Top with whipped cream, and bananas and drizzle a little agave nectar (or honey would work fine too) on top. I added a wee bit of chopped chocolate as well.

Cut into pizza like wedges and indulge.

last

This goes to Aparna's Sweet celebrations and Mansi's Vegtarian Thanksgiving

November 13, 2008

Wild Rice Salad with Cashews and Lemon-Mint Dressing

first

first 1

I took this amazing cooking class instructed by Omid Roustaei, (who is also a personal chef) a few weeks back. As healthy and nutritious as all his creations that day were, there was one particular dish that caught my attention "The wild rice salad".
It was a sensual burst of flavors in my mouth, almost like a perfect medley of sweet, bitter, nutty and every bit pleasantly Herby.

Wild rice is a different variety of rice that grows in water, and only the flowering part is above the water. It is black in color and high in protein, amino acids and dietary fiber, and low in fat. Gluten-free like every other rice.
They are normally used in sync with other rices and sold like a medley, but they can be brought separately too, and can be used in salads like these. They are harder than normal rice, and thus takes longer to cook.
I don't use wild rice on a regular basis, so got what I needed in the bulk section of the grocery store, that works out cheaper too.

The original recipe called for cranberries which I omitted, added green bell peppers, and subtituted zucchini with raw mangoes. And it turned out just the way I liked it.
Mangoes did add its own magic to the whole salad. It is a must try. And super healthy too.

Wild Rice Salad with Cashews and Lemon-Mint Dressing

Ingredients:

Salad:
Wild rice -1 cup
Vegetable broth - 2 1/4 cups
Raddichio/any bitter greens - 1/2 cup
Raw mango - 1 small (diced) (Could substitute this with zucchini)
Red pepper - 1 (diced)
Green bell pepper - 1 small (diced)
Carrot - 1 (diced)
Roasted salted cashew nuts - 1/2 cup
Salt - To taste

Dressing:
Olive oil - 3 tbsp
Lemon juice - From 2 large lemons
Garlic - 4 cloves (finely chopped)
Mint - 1 bunch chopped
Pepper - 1 tsp
Salt - To taste

Method:

In a cooking pot, combine wild rice, salt and broth and bring to to a boil. Simmer, and cover. Cook for about 40 - 60 min or till the grain is soft.
I used a rice cooker to cook the wild rice, so did not have to keep checking.
Cool completely.

In another large bowl, mix all the ingredients listed in the dressing section.

To this add the cooled wild rice, the rest of the vegetables, (except cashews), salt and pepper and let it sit for an hour in the refrigerator.

Just before serving add the roasted cashew nuts and serve.

Yields 4 to 6 servings.

last

This goes to:

Sangeeth's Eat Healthy Fight Diabetes event
Srivalli's Rice mela event
Kimi's Nourishing Holiday Food event
Ivy's World Food Day event
Suganya's Vegan Ventures event

November 11, 2008

Whole-wheat Chocolate Linzer cake - Photography in the dark

First display pic

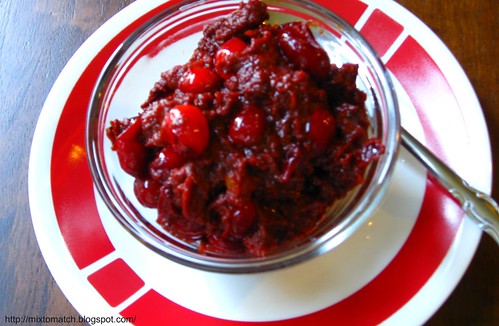
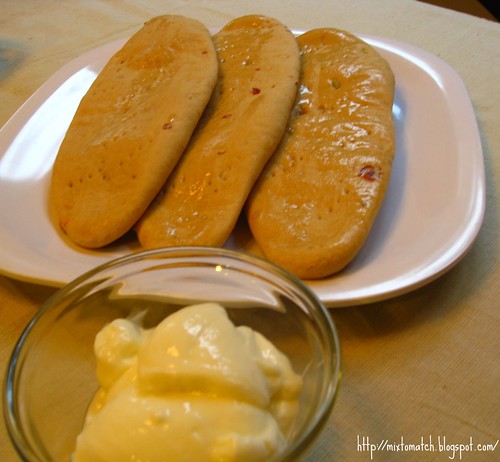
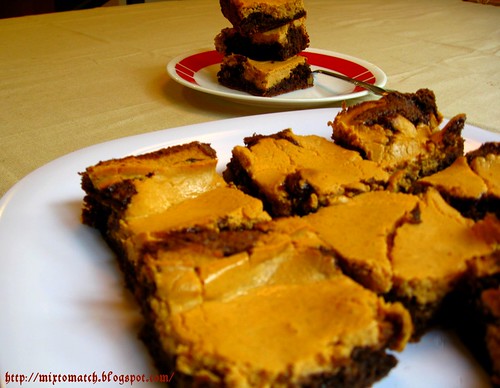
Any good food photographer will stress the importance of good lighting when one is doing food photography. (I am not one!) But what does a person like me do when the sun just won't shine???
With the cold gloomy winter setting in (if you have ever been/lived in the Pacific NW, then you would empathize with me) , taking photographs of food is getting challenging every day. I just have a normal digital camera, and I am so lost.
I have seen the food lighting project in a few blogs, but I just haven't got around to figuring it out, unless someone would do it for me. ;)
And the "white balance" feature in the camera just makes the food look eerie. LOL.

I would love to hear from you, how do you take good pictures when the right amount of lighting is not there?
I will update this post with good suggestions and ideas as I get them, that way everyone can benefit.

Few Updates: (For the rest, pls check the "comments" section)
I would have loved to link back to you guys (like I normally do), but the "post options" is screwed up right now in blogger! So frustrating!

"Priya of Akshayapatram": Lighting is a major problem and you can never beat good sunlight. I made the lighting system based on Lowel ego lights following Jai's instructions. It works very well, but I find it bulky to move around my apartment, as I don't have a dedicated place to set it up in. For now its lying on my bedroom floor and I usually don't have the patience to carry the food there to set it up and take photos. So size it based on your needs.
I have been managing at my kitchen counter with the tube lights ON,white light is the best! Planning on getting a smaller lamp that will be brighter, use a thin paper to diffuse the light coming out of table lamps though to avoid its harshness. You could also make use of the thermacol pieces that come with packages to bounce the light off surfaces to get good shadows/even lighting.
And then there is always an editing/post processing software to help you out a little. If you have a decently good capture, you can make it work by adjusting the brightness/contrast/exposure settings on it.

"Purva of Purva's Daawat": Softwares like picasa helps you making adjustments in the brightness of your picture.

"PG of My Kitchen stories": Try to optimise the colour balance in Adobe photoshop. It does no magic, but you can improve them a bit.

"Nirmala of Passionate Trials": Install a photo editor like Gimp (free) or Photoshop and you can add brightness to your photos very easily.

"Uma of Essence of Andhra": When you want to take a picture at night, just switch off the light in the room! Then switch on the flash of the camera and click the photo. You'll definitely get a perfect picture. I clicked a few pictures using this method and they are just perfect and bright. Will post those pics soon!

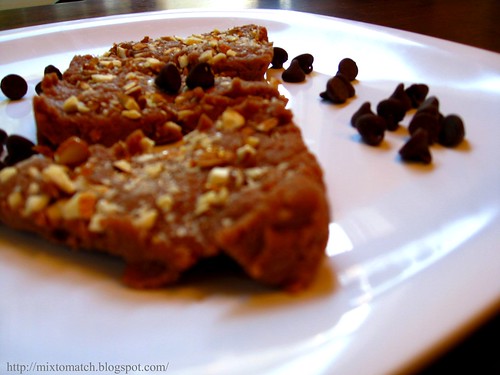
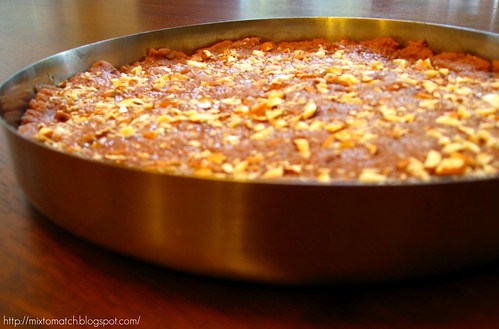
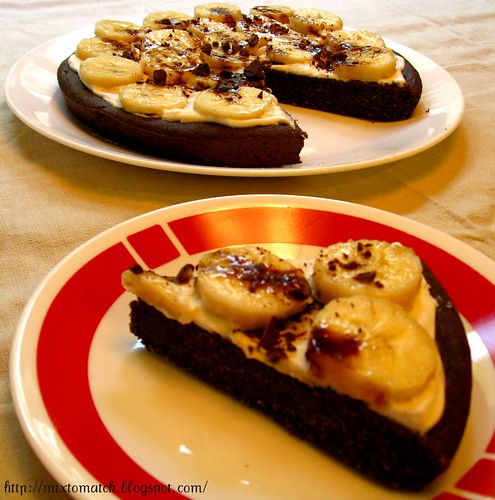
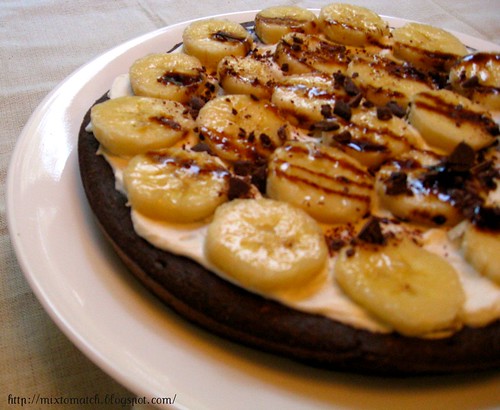
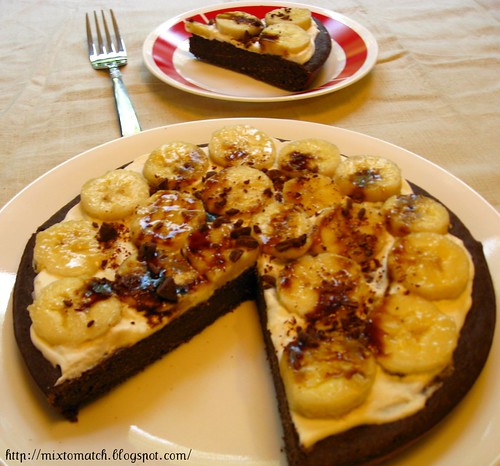
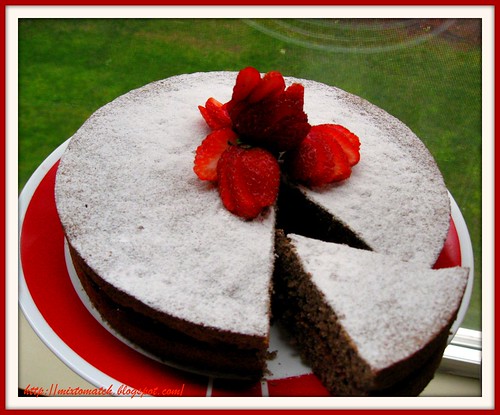
Cake, my dear loving cake... (I had ample sunlight when I took these pics, so I am not complaining about this one)

This is a cake modification of the "Austrian Linzer tart" recipe, and I have tried to take on a guilt free variation with a "no-butter", and "less-sugar" version made entirely with 100% whole wheat flour. What better than indulging in a cake without having to worry about your waistline!

Whole-wheat Chocolate Linzer cake

Preheat oven to 350F. Grease 2 round cake pans (maybe 8-9" diameter)/line them with parchment paper.

Dry Ingredients:

100% whole wheat pastry flour - 3/4 cup (Try not to use the regular whole wheat flour, unless you want a very dense cake)
Cocoa powder - 3 tbsp
Baking powder - 1 tsp
Salt - 1/4 tsp

Wet Ingredients:

Whole almonds - 2/3 cup
Vegetable oil - 2 tbsp
Skim milk - 2 tbsp
Almond extract - 3/4 tsp
Large eggs - 4 (Separated, meaning white and yolks in separate bowls)
Sugar - 3/4 cups (I use a little less)
Vanilla essence - 1 tsp

For finishing:

Strawberry preserves - 3/4 cup
Confectioner's sugar - Just enough to cover the top of the cake
Fresh strawberries - As many as you like!

Ingredients

Method:

Sift all the dry ingredients together and set aside.

Take the egg whites and beat them on low speed in a hand mixer till soft peaks form, slowly add 1/4 cup sugar and beat till you get stiff peaks.

Grind the almonds in a food processor, then add the milk, almond extract and vegetable oil and pulse till it forms a wet mass.

Beat the egg yolks & 1/2 cup of sugar separately in a bowl till the mixture turns pale yellow and creamy. Add vanilla essence.

Now add the almond mixture and mix till incorporated with the egg yolk mixture. Then add the flour mixture and fold/mix evenly.

Add one-third of the beaten egg whites and fold into the above mixture. Do not beat/whisk (as tough as it may be), then add the rest of the egg whites and fold till the batter looks even.

Divide equally into the two prepped pans and tap gently to settle the air bubbles.

Batter

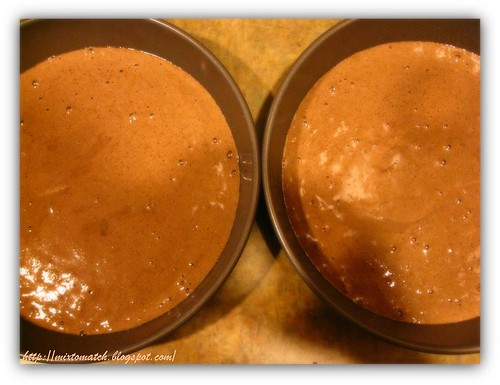
Bake in a pre-heated oven for 10 min, turn the pans midway, then bake for another 10 min.
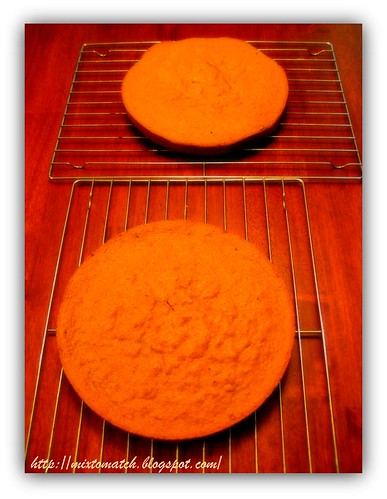
Cool completely on a cake rack for atleast an hour.

Cake on rack

Spread the strawberry preserves evenly on top of one cake, and then place the other cake on top and press firmly.
I did have pre-powdered sugar with cardamom (Indian spice) and it co-ordinated pretty well with the cake.
Dust the powdered sugar on top and decorate with fresh strawberries. Cut yourself a slice and enjoy!

Last display pic

This goes to:

Aparna's Blog anniversary
Mansi's Vegetarian Thanksgiving
Not Quite Nigella's The Ultimate Chocolate Cake
DK's AWED American

November 8, 2008

Semolina Bread Loaf - Amateur's delight

last

first 1

What is Semolina to a lot of people, is good old Sooji/Ravai to many of us.
It is also predominantly used to make pastas of different shapes and sizes. When one could make so much out of it, why not bread?

The last time I did a bread post, the most comments I got were how daunting bread making was to most of them. I really wanted to make something that was approachable and doable by even someone who is just starting out. So here it is, this time I forbid you from leaving comments that you can't do this :)

If you have never tried making bread before, this is a great place to start. And if you are a bread maker in the family, then this is something you should never miss.

For someone who is into healthy food like me, it may not be as "healthy" as whole wheat flour, but it does come out light, fluffy and has a beautiful light yellow tinge to it. How can one resist that?

Semolina flour should be available in the flour aisle of your grocery store, but I doubt there would be a pantry that uses Indian provisions where Semolina/Sooji/Ravai is missing!
So grab that, and grind it into a fine powder. It is sometimes difficult to achieve that because they are still coarse after grinding. If you have a heavy duty blender, sure give it a shot. I just got mine from the store. It was way easier.
But even the semolina flour that I got from the store, was a little coarse (texture was like fine granulated sugar)
I found the recipe from here, but the method I have followed is slightly different, and hence the detailed procedure in this post.

Go ahead, be bold, give it a try. I have tried to explain step-wise with pictures for your benefit.
Bread making doesn't have to be daunting anymore. Go girls and boys!

Semolina Bread Loaf

Ingredients:

Semolina flour - 3 1/4 cups (finely ground)
Warm water - 1 1/2 cups
Instant yeast - 1 1/2 tsp
Sugar - 1 tbsp
Olive oil - 1/4 cup
Celtic sea salt - 1 1/2 tsp (Or to taste) (Can substitute with regular salt)

Method:

Dissolve yeast and sugar in the warm water and set aside for 5 minutes. It will froth up.

Add the flour, olive oil and salt and mix well.

Knead for about 15 minutes by hand till you get a smooth ball. Dust with flour if needed.

before rise

Coat with a teaspoon of oil, cover and let rise for 2 hours.

Grease a loaf pan and set aside.

After 2 hours the dough would double in size.

after rise

Take it out, folder over three or four times. There is no need to punch it down.

Roll into the size of the loaf pan, place it seam side down into the pan. Cover and let rise for about 1-2 hours. This method is called proofing.

Preheat oven to 375F.

When you see the dough spilling over the sides of the pan after rising, it is time to bake it off.

proofing

Bake it for 35-45 minutes, and the crust should be golden brown.

oven

Remove from loaf pan, and let it rest for about an hour.
You may store this at room temperature for about 3 days, and store in the refrigerator for longer. I doubt if one can keep their hands off of this bread! Tastes divine.

first

last 1

This goes to:

Susan's Yeast Spotting
Mansi's Vegetarian Thanksgiving
Boaz's Bread Baking Day #14: Colored Breads
Suganya's Vegan ventures

November 5, 2008

Tofu Fennel Veggie skewers - Cookbook win

first

last 1

It does feel good to win something, especially a cookbook for a foodie like me.
Sra had this wonderful event "My legume love affair" last month. I did send my recipes like I do for any normal event, and then came the pleasant surprise that I won a cookbook for the event. I did not even know there was a giveaway until then.
Thanks Curry Leaf for letting me know about the win first, and for sharing the enthusiasm :)
The winning legumey recipe I sent in for the event was Garbanzo beans & Potato Cutlet

Let's talk some skewers, grills and fennel...

Grill pan would be an ideal choice for making skewered vegetables, but it not necessary. I used a normal griddle, and worked out just fine. You may alternatively also try roasting in the oven.

Skewers are normally made from wood, and need to be soaked in water before punching in the veggies. Otherwise you will end up burning the skewers from the heat.
Nobody likes burnt wood on the vegetables now, do they?

fennel

Fennel bulbs have a mild anise flavor and are commonly mislabelled as "anise" in some supermarkets. When buying fennel bulb, look for a white bulb with nice bright green thin leaves (like in the picture above, yeah I did cut off the top before I realized I wanted to take a picture).
The bulb is basically inflated leaf bases and are layered (like an onion)
Fennel seeds are commonly used in Indian cooking for seasoning or as a spice.
Another one of my recipes, that uses fennel is Egg Puffs.

Tofu Fennel Veggie skewers

Ingredients:

Firm tofu - 1 package
Fennel - A bulb
Carrots - One or two
Green bell pepper - 1 large
Red onions - 1 large
Red chilly powder - 1 tsp
Turmeric - 1/4 tsp
Salt - To taste
Pepper - 1/4 tsp
Olive oil - 2 tsp
Wooden skewers

Method:

Cut all the veggies into large cubes.

veggies

Drain water completely off the tofu, wrap in towel and place an heavy object on it for about 15 min.
Cut tofu into the same size as the veggies into cubes, and toss together with salt, oil, pepper, turmeric and red chilly powder till completely coated with spices and oil.

I like to roast my tofu in the oven at 425F for 20-30 min before skewering. That way my tofu is well cooked and the veggies are a little raw and get grilled only after skewering.

Skewer all the vegetables and tofu, and grill them on a pan till the sides are brown and roasted.
Another option if you don't have a skewer or a grill pan would be to toss all the veggies and tofu into a hot wok and saute.

Serve hot with rice or noodles.

last

first 1

November 3, 2008

Pumpkin Cheesecake Brownies

first

first 1

My second pumpkin dish in a row :) This is exactly the opposite of the Roasted Pie-Pumpkin spicy chutney I made a few days back. Time for something sweet, and something chocolate!
It just made me realize how versatile the pumpkin as a vegetable is, very few vegetables could boast of being that, tasting good in a dessert as well as a hot and savory dish.

Two thumbs up to Adam from whom I adapted this recipe... I made this the very same day he did the post. Well, it did take some time for me to post it, due to blah, blah, blah... but nevertheless here it is.
The only sad thing was I did not have any ice cream to go with it that day. Warm soft chewy brownies with cold vanilla ice cream melting on top. My taste buds just go bonkers over it.
But otherwise, it was great by itself.

Just a quick tip, whatever kind of brownies you are making, it is advisable to use a spatula to mix all the ingredients together. Using a hand mixer will incorporate air into the mix, and the brownie will end up like cake. Brownies are naturally dense, so keep them thick and soft.

I did make some small changes with the flour, cream cheese, butter, and sugar, so I have given the recipe below for the brownies you see in the picture.
If you like pumpkins and chocolate, this is your kind of dessert.

Pumpkin Cheesecake Brownies

Ingredients:

For the Pumpkin Cheesecake layer:

Fat free cream cheese - 8oz.
Pumpkin puree - 3/4 cup
Egg yolk- 1 (you will use up the white for the brownie part)
Sugar - 1/4 cup
Cinnamon powder- 1/2 tsp
Ginger powder - 1/2 tsp
Nutmeg powder- 1/8 tsp

For the Brownie Layer:

Whole wheat pastry flour - 1/2 cup
Unsalted butter - 2 oz.
Sugar - 1/2 cup
Espresso - 1 tsp
Semisweet chocolate chips - 4 oz + 4 oz
Eggs - 1 whole, and 1 egg white
Vanilla - 1 tsp
Baking powder - 1 1/2 tsp
Walnuts - 1/2 cup (chopped)

Method:

Preheat oven to 350F.

Grease a 8" square pan and set aside.

Take the softened cream cheese and sugar and cream together with the help of a hand blender. For about 4-5 minutes.
Add pumpkin puree and the egg yolk. Then the cinnamon, nutmeg and ginger powder goes in. The resulting mixture will be somewhat thin, you may want to check the consistency as you add the pumpkin puree. Stop when you think it gets too watery.
I used about 3/4 cup and the batter was still a little thin.
Refrigerate this mixture until you make the brownie layer. It does help to thicken slightly.

For the brownie, melt the butter and add 4oz. of chocolate chips to that and keep stirring. I did this in a microwave, checking at regular intervals. Chocolate burns faster in a microwave. Keep stirring till it is glossy and let it slightly cool.

batter

Now add the sugar, keep mixing. Then add eggs and vanilla and mix well with a rubber spatula.

In another bowl, sift together the whole wheat pastry flour, espresso and baking powder.

Toss the dry ingredients into the chocolate mixture, mix until all the dry ingredients are incorporated.
Add the walnuts and the rest of the chocolate chips (4oz.)and fold in.

Take the greased pan, pour in the brownie mix, then pour the pumpkin cheesecake mix on top.

bake

Bake for about 45 min. Check the middle with a toothpick. Bake until it comes out clean. Do not overbake.

last

last 1

This goes to:

Aparna's Blog anniversary
and
Art You Eat #5 - Autumn Edition