October 31, 2008

Roasted Pie-Pumpkin Chutney - Spice it up

first

first 1

Have you ever tried to make something that you wouldn't normally associate with a vegetable or fruit? I bet you have at some point. This is one such recipe, taking sweet pie-pumpkin and turning it into something hot and fiery.

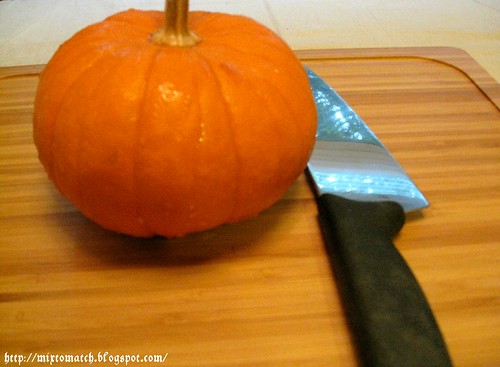
Pie-pumpkins are the smaller, sweeter variety of pumpkins, and have a firmer and a bright orange flesh.
Yes, they are slightly sweet, but you won't even taste it by the time you are done making the chutney.
Please do bear in mind, that this is a nice spicy/hot chutney (not for the faint of heart), the dried red chillies added were primarily to balance out the sweetness that is naturally associated with these little pie pumpkins.

As I have mentioned in the ingredients list, you could adjust the heat by lowering or adding more red chillies.
I just threw in all of my favorite things that I would normally add while making any chutney, or creating one like this for that matter.

There are very few spices as such in this dish, one that I would like to mention today is turmeric.
Turmeric has a component called "curcumin" and is emerging as a natural agent that helps fight cancer. It is also anti-inflammatory and acts as an antioxidant.
Indian cooking uses a lot of turmeric in most of the gravies, spice mixes and some savory dishes. It has graced this chutney as well.

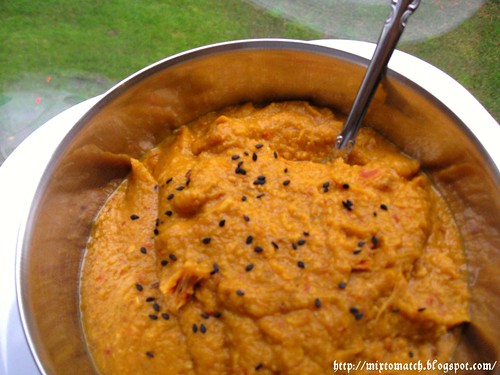
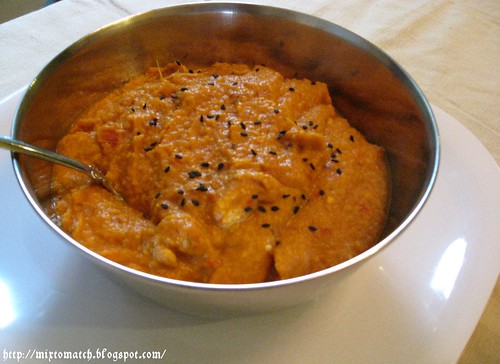
Verdict: One of the best chutneys my kitchen helped me cook up. Delish!

Roasted Pie-Pumpkin Spicy Chutney

Ingredients:

Pie Pumpkin - 1
Onion - 2 medium (large dice)
Tomato - 2 medium (large dice)
Cumin - 1 tsp
Dried Red chillies - 4-5 (I added like 10!)
Ginger - An inch
Garlic - 3 big cloves
Turmeric - 1/2 tsp
Curry leaves - 6-7 leaves
Asafoetida (Hing) - A pinch or two
Salt - To taste
Olive oil - 2 tbsp
Sesame seeds - To sprinkle on top

Method:

Preheat oven to 375F.

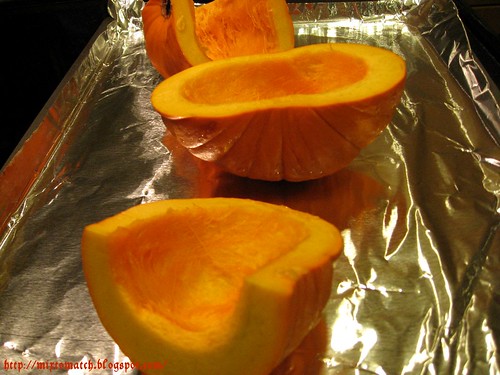
Cut pie-pumpkin into smaller pieces (3 or 4 depending on size). Place them on a baking tray. Drizzle a little oil on it, and bake it at 375F for 40 min or more. Insert a knife, and check for doneness.
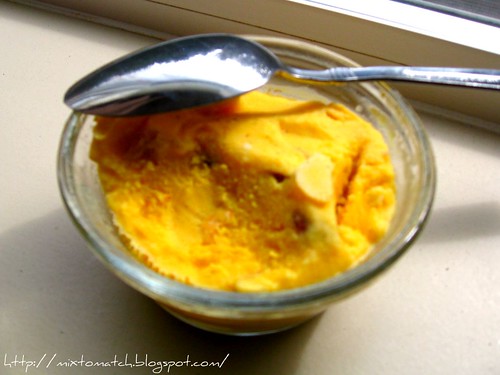
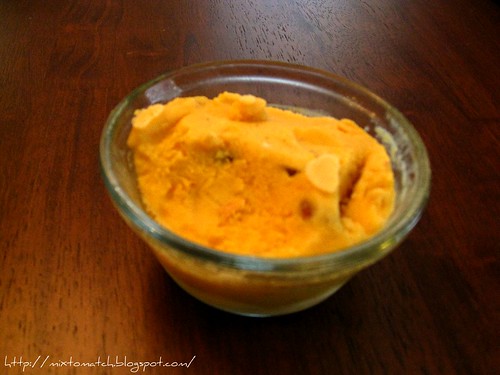
You should be able to scoop out the flesh after roasting in the oven.

roast

In a pan, heat oil. Add the cumin, curry leaves, garlic and ginger and saute.

Add the red chillies and turmeric.

Add the diced onions, and fry until translucent. Then add the tomatoes.

Saute all the ingredients till it is slightly soft, not mushy.

saute

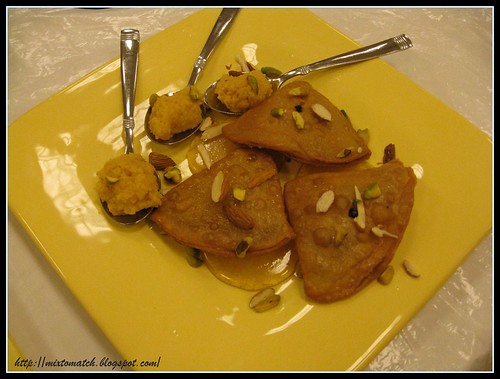
Add the pumpkin flesh that you scooped out earlier, salt, asafoetida and mix everything together under medium heat and let it roast for about 5 minutes.

In a blender, add some water, add the pumpkin mixture and salt and grind till smooth.

Taste at this point, and adjust salt/heat to your taste. If it is too mild, add some red pepper flakes and grind together.
If it is too hot, try drizzling oil as you grind.

Spoon onto serving bowl, top off with a few sesame seeds. Can be served with Indian breads, Dosai/Idli, or even like a spread in sandwiches.

last

This goes to:
Madhuram's AFAM-Pumpkin event

October 28, 2008

Nutty Energy Power balls - Healthy laddu

first

first 1

I wish all my readers/bloggers/non-bloggers a very Happy Deepavali.

Quick background: Deepavali is a major Indian festival, also called the "festival of lights" and marks the day when Rama (the great king of Ayodhya) defeated the demon Narakasura. More here.
The name "Deepavali" as such has undergone a make-over and has become "Diwali", but I still prefer to call it Deepavali. It has a nice ring to it.

This post happens to also mark my 50th! Still huffing and puffing! But feels like yesterday. Three months since my creative juices started flowing. Been a happy trooper since then.

Since I am celebrating Deepavali and my 50th post together, in tandem with my blog's theme of eating healthy, I present a sweet treat shaped like laddus (Indian dessert), but these are a healthy alternative to their counterparts which are loaded with butter and sugar. This is my own creation, and really has no hard-and-fast rules as to what goes in, you may increase or decrease quantity as needed. The dates and the raisins are the ones that hold the whole ball together, so I wouldn't tamper with that.
To find out what is in them that actually makes it a powerhouse of energy and nutrition, read on...

Nutty Energy Power balls - Healthy laddu

Ingredients:

Flax seeds - 10 tbsp
Peanuts - 1/4 cup
Dates - About 10
Quick Oats - 2 cups
Nuts - 1/4 cup (Assortment of almonds, walnuts and pecans)
Raisins - 1/4 cup
Chocolate chips - 1 tbsp
Cardamom - 1/4 tsp

Method:

In a food processor, blend all the ingredients separately except the dates and raisins.

Add the dates and raisins separately and blend. This will turn into a nice gooey mass. Now add the rest of the ingredients and mix everything together in the food processor.

Shape them into little balls, and serve. Store in an air-tight container for later use.

Thanks Yasmeen for the "Chocoholic Award". I somehow did manage to get some chocolate into this recipe ;)

last

last 1

Rolling them off to:

Priti's Festive Food: Diwali
Sunshinemom's FIC-Brown
Srivalli's JFI – Festival Treats
Aparna's Blog Anniversary
Easy Crafts WYF: Party Food
Vaishali's Sweet Vegan

October 25, 2008

Eggplant Curry Pizza on a Pita

first

last

Why is it that as adults we forget to be like children at times? The carefree attitude, no responsibilities, being happy with little things that cross our way... and the most importantly - to laugh.
Ah, it was so good to be a child. Free from pressures, stress and all the lifestyle changes that come with it.
I am not asking everyone to leave their jobs or responsibilities and sit at home and fool around. But wouldn't it be nice to make some teeny weeny time to be children again.? That would be the greatest relaxation one could ask for.
Smile at small things that you wouldn't stop by to appreciate, and appreciate things (and people) that we would otherwise take for granted, and laugh with your loved ones like we were children again.
As we grow up, we need bigger and grander things to make us laugh. The little things that amused us as children don't interest us anymore. The small actions that we used to enjoy have lost its charm. Yes, the problems, the loss, the relationships, the rat-race all come as reasons in this rapidly changing world. The only question is "What is it that matters to me at the end of all this?" Tough, but me included needs to figure that out.
But for the meantime, there needs to be no reason, or a grand joke. Smile, it costs absolutely nothing. :)

I wouldn't bog you down with a heavy dose of cooking today after all that talk...
Let us keep it light and quick.
Pizzas and I go a long way back. Getting the pizza base from the store back home, and adding on cheese and toppings, and compensating the lack of a oven with a griddle, and by covering it up with a big pot to make the cheese melt.
You ask why the trouble? Well, the "pizza huts" hadn't started mushrooming yet.
And what else was a girl supposed to do, than make her own pizzas?
Now, it is a breeze, like this one. I used the Eggplant in coco-peanut curry as the main ingredient in this one. Worked like a charm. So, if you are having leftovers of curries, and masalas, now you know what to do!
Smear on!

Eggplant Curry Pizza

Ingredients:

For the masala recipe: Click here

For the pizza base: Use a ready made whole wheat pizza crust, or a pita bread. I used a whole grain pita.

Pizza sauce - Just enough to smear on the base
Potato slices - Baked or microwaved with a little salt (optional)
Part skim mozzarella cheese - To sprinkle on top, you could do heavy or light as you prefer.
Red pepper flakes - To season

Method:

Preheat oven to 425F.

Smear the pizza base with the sauce lightly.

Top with the eggplant masala and place a few potato slices on top.

Sprinkle with cheese and red pepper flakes.

bake

Bake it off at 425F till the cheese is bubbly and lightly brown.

Take it off the sheet and dig in. As simple as that.

first 1

Thanks Ramya for passing on the "Hard Working Food Blogger Award" and for thinking of me.

October 22, 2008

Almond Puri with Fat-free milk halwa - For the books

Almond Puri

Confused as to why all the sudden "fried goodness" from me?
Well, this is an old post and has an update, this recipe "Almond Puri" along with my "Egg Puffs" recipe has been published in the "Ekal INCREDELICIOUS 2008 Recipe Treasures" book.
This whole experience from participating, winning, and to this, could be called my trigger to start writing this blog and showcasing my recipes online. I am pretty happy with both.

Puri is a kind of unleavened bread that is deep fried in oil. It is served for breakfast, lunch or dinner. It is basically savory, meaning it is made from flour and salt. But this is a dessert variety. I have not tasted sweet puris anywhere else other than those made by my mother. So, this is what says "home" to me.

My enthusiastic post written earlier on is here:
Now it feels like reading a long lost secret letter!

My "Almond Puri" recipe won the second place in the "Ekal Incredelicious 2008" in the dessert category. Yay! my first win in any competition ever! And feels good...
This is my mom's recipe which my brother and I used to love as children. Just a few tweaks here and there, and made it my own.
If you have visited my blog before, you might have noticed that I am normally into healthful cooking, but a few puris in moderation never hurt, right?

I must admit that there were quite a few interesting and delicious plates alongside mine, and were quite innovative. Got an opportunity to learn a lot of new things! A good experience overall :)
I am posting this recipe for the people who tasted it yesterday and wanted to try it at home. Happy cooking!

Almond Puri with Fat-free milk halwa

Ingredients:

For Puri:
Whole wheat pastry flour/Atta – 2 cups
Almond paste – ½ cup (Soak, peel, and grind almonds into a paste)
Nutmeg – ¼ tsp
Salt – 1 pinch
Melted butter – 1 tbsp
Clove – A few to seal the puris
Water – If and as needed (to form a dough like consistency with the above)
Oil – For frying

For Filling:
Rice powder – ¼ cup
Ghee (clarified butter) – 3 tbsp (or just enough to form a paste with the rice powder)

For Syrup:
Sugar – 2 cups
Water – 1 cup
Cardamom powder – ½ tsp
Saffron – 1 pinch crushed

Accompaniment (optional): Milk halwa (Easy method)
Condensed milk (Fat free is an option) – 1 can
Plain yogurt (Fat free is an option) – 3 tsp
Cardamom – 1 pinch
Ghee (clarified butter) – 1tbsp
Mix all the above in a microwave safe bowl, and microwave for 2 min, take it out, mix, and microwave again for 2 min. Repeat till the mixture is light brown in color. Serve as accompaniment with the puris.
For detailed recipe check out FAT FREE MICROWAVE THERATIPAAL


Method:

Syrup: Mix sugar and water in a heavy bottomed pan and let it come to a boil. Wait till it reaches one string consistency (235° F–240° F). Add saffron and cardamom and set aside.

Puri: Mix the whole wheat flour, almond paste, salt with the melted butter. Knead till it reaches dough like consistency, if needed add a little water.

Form small balls, and roll out into circles, say 5” in diameter. Brush on the filling paste, fold into a semi circle, again brush on filling and fold such that it forms a triangle.
Seal the layers with a clove in the middle to prevent it from opening. Press down edges very slightly.

Shallow fry them over medium heat in a pan till golden brown.

Dip the puri in sugar syrup and serve them with slivered almond and pistachios along with milk halwa as accompaniment.

This is off to these lovely events:

FIC-Brown by Sunshinemom
JFI – Nov’08 – Festival Treats by Srivalli
Yummy Festival Feast - Diwali by Pallavi
Festive Food: Diwali Celebration by Priti

October 20, 2008

Banana Walnut whole wheat scones - Bananas or nuts?

first

first 1

Have you heard of the "Talking library" in Santa Monica this weekend? It was on the news a couple of days back. The concept goes something like this...
You can borrow a human book, yes a person (instead of a book) who can converse with you on a particular subject for 30 minutes. And then if there are no holds on that person, then you can extend the lending hours.
To avoid hassle to the regular patrons of the library, these sessions are held in the open or in designated areas of the main library.
It is a part of exchanging culture, ideas and knowledge.
If you ask me, I think it is an excellent idea, I even went up on the Internet looking if there was something similar in my local library! Unfortunately not, but maybe I should place a suggestion...

This has nothing to do with today's recipe, but it was a pretty interesting piece of information worth sharing.

Are you in for bananas or nuts? Try both...
Walnuts, or any nuts for that matter are best kept in the freezer section of your refrigerator. Why? Because, nuts in themselves are loaded with natural oils, and those oils make the nuts turn rancid if kept out at room temperature. Have you had the nuts smell weird after being kept out for a long time? It happened to me all the time, but now I just get a huge bag and stash them, and forget it until I use it for something as delicious as these scones. Huge bags, because nuts are economical when purchased in bulk.
I don't need to talk about bananas now, do I?

These scones make for a great healthy breakfast or a snack to go along with coffee or tea. The frosting on top is basically a little sugar and butter drizzled on top, but this is completely optional. Since I reduced the sugar content of the scones, it was perfect to just add just a tad on top. A little honey would work just as well.

Banana Walnut whole wheat scones

Ingredients:

Whole wheat pastry flour - 3 cups
Banana - 1 cup mashed
Light brown sugar - 1/2 cup packed (I used a couple of tablespoons less)
Baking powder - 2 tsp
Baking soda - 1/4 tsp
Cold butter - 3 tbsp (cut into small cubes)
Low fat Buttermilk - 1/4 cup
Pure Vanilla essence - 1 tsp
Egg - 1
Salt - A pinch

For topping:
Walnuts - 1/3 cup (coarsely chopped)
Brown sugar - 1 tbsp

Method:

Preheat oven to 400F.

Mix the topping ingredients: brown sugar and walnuts and set aside.

Sift whole wheat pastry flour, baking soda, baking powder, and salt.

Mix in the brown sugar.

Add the cold butter and either using a pastry cutter, or with your bare fingers, rub in the flour into the butter till it is crumbly.

Now, add the egg (beaten slightly), bananas and the buttermilk and form it into a dough. Do not over knead.

Flour the surface you are going to work on, and transfer the dough, form into a ball, and roll it or pat it down into a circle, about 8" in diameter of 1/2" thickness.

Sprinkle the toppings and press it down gently.

roll1

Cut into wedges.

roll2

Grease a cookie sheet and place the wedges gently onto it.

bake

Bake at 400F for 20-25 minutes or till golden brown on top.

They are great as it is. But if you want to kick it up a notch, then drizzle honey, or combine a little sugar and butter and drizzle on top after completely cooled.

last

October 17, 2008

Peanut Brittle Bar to you, Chikki to me

PICT0017

"Chikki" is what we used to call peanut brittle bars as children (I still call them that). Sounds kind of cute isn't it?
It is a integral sweet part of every school going kid, little bars of chikkis bought from small-shop vendors at the corner of every street.
They are traditionally made from peanuts and jaggery (Indian brown sugar), but they can also be made from other ingredients that I will get to shortly.

Life before candy thermometers was a bowl of cold water sitting beside the hot sugar syrup which was boiling away in a hot pan.
We would take a little of the sugar syrup and drop it into the bowl of water to see what stage it was at.
If the syrup dissolved it meant we could only use it as a syrup.
If we were able to shape it with our fingers, then it was at the soft-ball stage, and if we could roll it out without the sugar dissolving into a very firm ball, then it was at the hard-crack stage.
Those were fun days, getting to dunk the sugar in the water, playing around with the various stages of melted sugar, and then since those little pieces couldn't be put back into the hot boiling liquid, we would end up eating them!
Life's little pleasures.

Now, I just fit the pan with the thermometer and forget about it. These are labor less pleasures, which seem to suit today's lifestyle.
And here I speak as though I am a hundred years old!

The recipe here today is for making peanut brittle, you may substitute the peanuts with other nuts (say almonds, pecans or cashews), sesame seeds, or even puffed/beaten rice. The procedure listed below remains the same.

Peanut Brittle to you, Chikki to me

Ingredients:

Skinned white peanuts - 2 1/2 cups (halved, not the whole peanuts)
Jaggery (Indian brown sugar) - 1 cup packed
Water - 1/4 cup
Cardamom - 1/2 tsp
Dried Ginger powder - 1/4 tsp

Hardware:
Greased tray
Candy thermometer

Method:

Dry roast the peanuts in a pan till lightly brown or microwave it for a couple of minutes till crunchy.

Line a cookie sheet with wax paper/aluminium foil and either, grease liberally or use a non-stick spray to prevent sticking.

In a non-stick pan, fit a candy thermometer, bring the jaggery and water to a boil, mixing it frequently.

When it reaches close to hard-candy stage (a little lower than that stage), turn off the heat, and immediately add the peanuts, cardamom, and dried ginger powder.

Mix well, so the peanuts are coated with the sugar syrup.

Immediately pour the entire mixture onto the greased tray, and spread with the back of the spatula into a 1/2 inch thick layer. Do this as quickly as possible, since it tends to harden quickly.

Let it sit for about an hour to cool. If you can break off a small piece, it means the brittle has set.

Now, break the entire slab into smaller pieces by hand.

Store in an air tight container for later.

October 15, 2008

Oats Whole-wheat Bread - I say Roll

last 1

last

I would rather call them rolls, but they are larger than rolls and smaller than a regular loaf of bread, and there in lay my confusion with naming it. So call it whatever you want, this bread/roll/mini loaf is just the fresh, home-made bread that we all crave for.

Bread making is known to be therapeutic, I don't know why, nor do I have the facts to prove it, but I would like to believe it.
Not many things in cooking is as satisfying as using your hands to make it, knead it, watch it grow, and then bake it off to a comforting perfection.
Nothing says comfort like bread, and making it is nothing less of sheer pleasure.

And I hate to stress the point, but if you are eating bread, whole wheat is the kind you should entrust your body with. Well, at least most of the times.

Let me talk about the origin of this recipe a little bit. It was taught at a "PCC cooks" class which I was assisting. PCC is a health foods stores and has various classes on healthy food concepts and nutritious cooking methods. Not all their classes focus on health, but some do, and I try to take in as much information I can. So far, so good.

From my bread making experience, here are 6 tips for a good loaf:
(This is not the end of all, I will make more bread, and I will have a lot more to share)

->I am guilty of using fancy yeasts in the past, but for real a good normal "Instant yeast" should do the job neatly.
"Highly active" sounds like something that only explosives should be labelled.

->Flours high in protein yield very good loaves. Bread flour is certainly one, but not having used that before, and for "healthy" reasons I would rather stick to the whole wheat kind. White whole wheat is lighter in color and yields a lighter loaf than the regular whole wheat flour.

->Refrigerate whole wheat flour. They become rancid if stored at room temperature. Unlike all purpose flour, it is unbleached, unrefined and filled with nutrients and those are best preserved when refrigerated.

->If you don't use a bread machine, like me and many others, kneading by hand is a non-compromising option. Infact, it gives you the satisfaction of making it all with your own hands. Knead for at least 15 min to get the gluten working in the dough.
It is hard to over-knead the bread dough.

->Hot water kills the yeast, and cold water fails to activate the yeast. Warm water is ideal, not too hot, not too cold.

->Patience is key, let the dough rise. Let the yeast do its job.

So to get off to a nice promising start, I lost the original recipe! (Laughing devilishly)
I am going to try to get the recipe and the method off of my head right now. But I promise good results if you get around to trying it.

On another note, thanks to Uma, Suma, G.Pavani, Shama, Vibaas and Curry Leaf for the nice "Butterfly award" they so kindly passed over to me. I really appreciate it girls. :)

Oats Whole-wheat Bread/Roll

Ingredients:

White whole wheat flour - 1 and 1/4 cup
Cooked oats - 1 cup
Honey - 1 tbsp
Olive oil - 1 tbsp
Toasted Sunflower seeds - 1 tbsp
Yeast - 1 tbsp
Warm water - 1/4 cup (use less or more to knead)
Celtic sea salt - 1/4 tsp (or to taste)
Quick oats - A handful to roll the dough in

Method:

Mix cooked oats, honey, and oil and set aside.

Add the warm water to the yeast and let it rest for 5 min. It will become frothy.

Mix the flour, yeast, oats mixture and the salt and start kneading. Add more warm water if needed.

Knead for about 15 minutes till the dough is soft and smooth. Add the sunflower seeds and work them in for 2 minutes.
Transfer it onto a large greased bowl.

Cover the dough and let them sit for at least an hour or two to rise. The more the better.

Preheat oven to 375F.

The bread dough should have doubled in size. Then, take it out and knead them again by hand for 5 minutes. There is no need to punch it down!

Shape it into a loaf/roll shape, wet the top surface with a little splash of water and roll it over the quick oats. This is just to give the top an nice look.

Score the surface and set the roll on a baking sheet on the top rack and bake at 375F for 30-35 minutes or till it becomes brown on top. The bread should sound hollow when tapped.

Let rest for about an hour before devouring.

Serve warm with a good, light cholesterol-free butter spread or fruit preserves.

first

first 1

This goes to Susan's Yeast spotting, Divya's Diet foods.

October 13, 2008

Pistachio Ice cream - Instant and fat-free

first

first 1

This is my last ice cream recipe for this season. Not many are fond of cold stuff in the already freezing weather, and I don't expect to be as crazy as I am, so I have put ice cream making on hold till next summer :(
So, if you are still reading this blog, and if I am still writing :P(which I hope to) next year, you will definitely see some good stuff in the Ice cream category.

Other low fat ice creams here:

Rasamalai Ice cream
Banana choco-nut ice cream

Check out the Meme at the end of this post. Pathetic!

Pistachio Ice cream - Instant and fat-free

Ingredients:

Skim milk - 4 cups
Pistachio Jello Instant pudding - 1 packet (I used the sugar-free, fat-free kind)
Sugar - 3 tsp
Pistachios or Almonds - 1/4 cup chopped
Saffron - 1/4 tsp
Vanilla essence - 1/4 tsp

Method:

Blend all the ingredients, except the nuts in a blender till creamy and frothy.

Pour into an ice cream maker and let it do its thing for about 20-25 minutes.

Add nuts one minute before turning off the machine.

Best served immediately at soft-serve stage. Freeze for later use.

last

Usha and Uj have tagged me for a Meme about sharing 7 facts about me.

The rules of the tag are:
(a) List these rules on your blog.
(b) Share 7 facts about yourself on your blog.
(c) Tag 7 people at the end of your post by leaving their names as well as links to their blogs.

7 facts about me:

1. Like to cook (Obviously)
2. Like to bake even more (Lesser pots and pans, lesser cleaning up)
3. Like to bake desserts in particular (Blame it on the sweet tooth er... teeth?)
4. Like chocolate in my desserts in some form (Who doesn't?)
5. Like if nuts are added to chocolate (I am nuts about nuts!)
6. Like it if I had it all to myself (Sigh!)
7. Like it if I did not have to work out after eating all that :(

I, in turn tag:

Adam
Curry Leaf
Prudy
Madhuram
Mitr Ideas
Mahimaa
Happy Cook

If you have already done this, pardon my ignorance and pls link back to the tag, so everyone can see it.

This goes to Divya's Diet foods event

October 10, 2008

Farfalle pasta in a Saffron infused creamy pizza sauce

First

First 1

Can you imagine losing all your data from blogger? For food bloggers, the loss of content "I feel" means a lot of re-work. Cooking, presenting well, taking pics, writing down the recipe, posting the pics and recipe online....
That is heck of a lot of work to repeat, what would happen if you lost all of it? Hard to imagine right?

I was reading through a small article by Vanessa and I thought it was important to share the information.
If you already know it, or have implemented it, good for you! smart you!, please share such information that you already know of, so that people like me (who wouldn't have even given it a thought) can be aware of.

So, the issue here is "we don't back up" the content we so painstakingly write in our blogs. Well, at least I don't!
And if something were to happen to blogger (I am only talking about "blogspot" here) as Vanessa points out is inevitable some day. Issues like getting locked out or being banned from your own account are horrible things to hear, but what happens to all your blog posts? We normally don't subscribe to our own posts, so where is the backup?
What she suggests in her article is "create an email ID and send your posts to it" as you publish.
For this: Goto Dashboard --> Settings --> Email --> "BlogSend Address"
Enter your "non-google" email ID and have your posts sent to it.
I would in addition suggest, have a copy of pictures in your local hard drive.
Please back up data! And share information. Good luck.


Useful updates from Readers:
I am leaving them here, since not everyone feels the need to comment, and might end up missing out on all this wonderful knowledge.

Nick: "I actually upload my photos to photobucket.com and link to them from there as well as store all of them on my computer. The other thing you should do (if you made any changes) is to copy the HTML Layout code into Wordpad (or TextEdit for Mac's) and save it to your computer as well."

Ivy - "About blogger, there is an easy way to backup your blog. http://www.codeplex.com/bloggerbackup
However, I have moved to wordpress and have not yet found out how I backup my wordpress posts. If someone knows I would appreciate the help."


Mike of Mike's Table - "As for the backups, definitely a not glamorous thing but everyone absolutely should do it. I almost lost it all once but lucked out. I use Wordpress and there are a handful of plugins out there which do backups of everything (database + your photos) automatically and can even be scheduled to email the backups to you periodically. I believe there are also some which integrate with Amazon's storage service (S3), but that isn't free (although it sure is cheap)."


Now, let us back up some pasta in our tummy, shall we?
I am no Giada of pastas but I do cook decent tasting pasta meals :)
So, here are some things that might help while cooking pasta:
Good quality sauce makes the world of difference.
Do not keep stirring the pasta while it is boiling in the water, a couple of times would suffice.
Salt the water well before cooking the pasta in the pot.
Add oil (and salt) after draining the water to prevent the pasta from sticking to each other.
Cook pasta to al-dente (fancy word for not fully cooked/firm, should still have a bite to it like Giada says), or it tends to turn sticky/mushy (especially the whole-wheat ones.)

I bought Durum wheat pasta, I had it delivered (so I did not buy it after seeing it) and was under the impression it was whole-wheat, as that is what it said in the package, but apparently semolina is refined flour, so there is a unexpected indulgence. Healthier option would be whole-wheat farfalle undoubtedly.
Did you know Farfalle is derived from the Italian word "farfalla" which means butterfly. That explains the shape, doesn't it?

As for the sauce, I have used a jar of pizza sauce that I had at hand. If you choose to go my way, please use a good quality one, that is key.
Saffron gives the sauce such a rich flavor and aroma, you have to taste it to believe it. I was pretty happy with the outcome. If I have interested you enough, read on for the recipe.

Farfalle pasta in a Saffron infused creamy pizza sauce

Ingredients:

Organic Durum wheat pasta - 1 box
Pizza Sauce - 1 bottle
Heavy cream - 1/4 cup
Saffron - 1/4 tsp
Green onions - 1/4 cup chopped
Mixed vegetables of your choice - A few cups, cut in the same size
Olive oil - 3 tbsp
Black pepper - 2 tsp
Salt - To taste

Method:

Cook the pasta according to package instructions, add a wee bit of salt and olive oil after draining the water and set aside.

Cook vegetables of your choice in a little olive oil, add salt, pepper and set aside.

For the sauce, bring the pizza sauce to a medium heat, add more pepper if needed.
Crush the saffron between your hands and mix it to the heavy cream.
Add the heavy cream to the hot pizza sauce and stir for a minute. Turn off heat. You may add herbs if you want, but I wanted to keep the saffron flavor prominent, hence I did not.

To serve, spoon the sauce at the bottom of the plate, layer with cooked pasta, then the vegetables. Add chopped green onions.
Sprinkle a little crushed dry saffron on top.
The heat from the sauce and pasta elevates the aroma of saffron. Heaven!

The bread served along with this pasta is Roasted Garlic Challah Bread

Last

This is off to Aartee's Sapadu Ready event

October 8, 2008

Easy Low-fat Cheesecake with Strawberry marbling

First

First 1

October is National Breast Cancer Awareness Month.
It is the second most common kind of cancer affecting women, after lung cancer.
I am all for women supporting women in any little way possible. Please raise awareness about breast cancer if possible in your blogs or websites. You can find more information at NBCAM
National Breast Cancer Awareness Month is focused on encouraging women to take charge of their own breast health, by practicing regular self-breast exams, making sure to schedule an annual mammogram, adhering to prescribed treatment and knowing the facts about recurrence - NBCAM

Relevant to the awareness theme, I decided to make something pink, hence the cheese cake with pink strawberry marbling. And to stick to the health factor, the low-fat version.

This is probably one of the quickest cheesecake recipes you can whip up. So people who are on the run, or who are just plain lazy (like me at times) citing "lack of time" to bake this beauty is no excuse!

Condensed milk has a ton of sugar in it, so I did not bother to add extra sugar, if you would like it to be a little sweeter you may add a little, say a few spoonfuls of sugar. This is completely optional though.

I have done a marbled effect by swirling the liquid strawberry preserves with a toothpick on top of the cheesecake. You can do this step as soon as it is out from the oven.
You may add sugar-free cherry pie filling on top for a added visual appeal. Either way, chill thoroughly before indulging.

With lower fat content, it is a calorie-conscious indulgence without any compromise to your sweet tooth.
As you all might know by now, my sweet tooth is huge, golden and gleaming! I polish and make it shine with my desserts every now and then. (Grin)

Easy Low-fat cheese cake with Strawberry marbling

Ingredients:

Reduced fat graham cracker crust - 1 shell
Eggs - 4 (I used 3)
Low fat cream cheese - 1 small tub (About 180 gms)
Fat free condensed milk - 1 can
Low fat evaporated milk - 1 can
Sugar - 2-4 tbsp (optional, I did not use it)
Pure vanilla extract - 1 tsp

Method:

Preheat oven to 325F.

Beat the eggs until light and fluffy with a hand mixer.

Add softened cream cheese and beat for a about 3-5 minutes till the mixture becomes smooth and soft.

Add the vanilla extract, condensed milk, and evaporated milk and mix for another couple of minutes.

Pour mixture into the graham cracker crust and bake at 325F for 50-60 min. Insert a toothpick and check if it comes out clean. It there is cheese sticking to it, bake it for some more time. The center should be almost set at this point.

At that point, remove and let rest for at least 4 hrs in the refrigerator after bringing it to room temperature. Letting it sit in the fridge overnight is a better option.

Slice and serve chilled with sliced strawberries.

Last 1

Last

This goes to Ley's Baking for Breast Cancer Awareness

October 6, 2008

Garbanzo beans & Potato Cutlet

First

I love(d) playing the guitar... but before you get any ideas as to how much of a pro I am... I was a beginner student at the Trinity school of music back home, and sadly never went beyond the basics. How pathetic. My guitar, as we speak is rigorously gathering dust beneath my armoire at home. Sorry all you musically inclined buffs, I mean no disrespect to music or the instrument, but that is how the way it is.
And boy! I did really lose touch with playing it. Isn't that one of the things that would come back to you even after a long hiatus? Like for instance driving a bicycle! And did I suck at that too recently. Not even gonna go there.
But I guess I could justify saying that I never knew how to play it thoroughly...

There goes one of the many things I have tried my hands at that didn't see the dawn of day. Is that why they call people "Jack of all trades, master of none?" And why is being master of any one trade "better" than the former? I never understood the assumption behind it.

With that story, can we get on to more important things like... making these figure-friendly garbanzo patties/cutlets! :)

Chick peas/Garbanzo beans are a true source of protein for vegetarians. They are very low in fat, and are also good ways of getting zinc, fiber and folate into your diet.
I always have a few cans stacked up in my pantry. It is great for and in curries, gravies, patties, hummus, or even in rice. Only thing I haven't tried yet is in desserts! Hmm, thinking of which... it might not be a bad idea!
Addition of potatoes in these patties are purely for the binding property to bring all of the ingredients together. And a potato or two never hurt, right?
Vegetables and herbs are completely flexible, and you could add what you have at hand, except tomatoes, that would be one soggy cutlet.
These are best eaten warm/hot right out from the pan. Microwave them before eating if you plan to store them longer.

Garbanzo beans & Potato Cutlet

Ingredients:

Garbanzo beans/Chick peas - 2 cans
Potato - 1 large (Boiled, peeled and mashed)
Red onion - 1 medium (finely chopped)
Green bell pepper - 1/2 cup (finely chopped)
Carrots - 1/4 cup (finely chopped)
Green onion - A handful (finely chopped)
Cilantro - 1/2 cup (chopped)
Curry leaves - 4-5 (torn into small pieces)
Bread crumbs - 1/4 cup (optional)
Garam masala - 1/2 tsp
Chilly powder - 1/4 tsp
Black pepper - 1/2 tsp
Salt - To taste
Olive oil - Just enough to cook the cutlets (we are not frying them)

Method:

Dry blend the garbanzo in a food processor without water. It will end up with a crumbly texture.

Add the mashed potatoes to the beans and mash together well.

Add all the vegetables (red onion, green pepper, carrots, green onion) and herbs (cilantro and curry leaves) and mix well.

Add the chilly powder, pepper, chilly powder, garam masala, & salt and combine.

Lastly add the bread crumbs. Mix. This is just to absorb the extra moisture.

Taste the raw mixture to check for salt/spice. If the flavors are balanced, shape into small patties and set aside.

Heat a pan with a couple of tablespoons of oil on medium heat, and add the patties and let cook on one side for about 5 minutes or till golden brown. Flip to the other side and add oil if needed. I did not have to as you can see from the image below.

Pan

Swirling the patties around in the pan helps with the even browning of the cutlets and the little oil in the pan is evenly distributed as well.
Do not push the patties down with the spatula since it tends to break.

After the patties are cooked on both sides, remove from pan, and serve with sliced onion, and chutney or tomato sauce.
None of which are in the picture!

Last

This goes to Vandana's Lunchbox special event & Sra's My Legume Love Affair event

October 3, 2008

Rasamalai Ice cream - Say cheese for low-fat!

First

Got you curious, didn't I? :)
Rasamalai, ice cream and that too low-fat, sounds too good to be true, right?
Yes, I am putting all those three magic words in one sentence.

You might quickly want to check out the basic recipe from my blog for Fat-free Quick Rasamalai
The same ingredients from that recipe go into making this yellow delight. Only colder and creamer this time.
I used fat-free half-and-half milk the first time, and another day I used evaporated milk, both were pretty comparable. If you are feeling particularly indulgent, then you may use full-fat condensed milk.

Did you know that evaporated milk is basically condensed milk minus the sugar? All that stickiness is actually from sugar and sugar alone!

Talking of which, another great substitute would be Fat-free condensed milk, but it is loaded with sugar, you may want to cut down on the sugar that you add separately.
Since you add ricotta cheese, it will end up creamy either way.

Believe me, it is way too easy to make (as you can see from my instructions below) and the most delicious thing my ice-cream maker has churned up for a cold breezy fall day. Brrr!
People talk about eating ice cream on a hot summer day, and how cooling it is and stuff. But I for one, like to have ice creams on a cold day... rain would be an additional bonus!
How is that for being different? (I can envision a few of you frowning already!)

Low fat Rasamalai Ice cream

Fat-free/ Low-fat Ricotta Cheese - 2 cups
Sugar/Splenda - 1/2 to 1 cup (Depending on how sweet you want it)
Fat-free half-and-half milk/Evaporated milk - 2 cups
Skim milk - 1 to 2 cups (Depending on the quantity your ice cream maker can hold)
Slivered almonds and pistachios - 1/4 cup
Cardamom - 1/4 tsp
Nutmeg - A pinch
Saffron - 1/4 tsp crushed

Method:

Dump all of the ingredients into a blender except the nuts.

Ricotta

Blend till smooth, frothy and creamy. Couple of minutes.

Blend

Pour into an ice-cream maker, and let it do its thing for about 20-30 min. Add the nuts one minute before you turn the ice cream maker off.
You may eat it as soft-serve immediately or freeze it for a harder scoop. Like all other ice creams, you may have to thaw it out a little before eating (if you freeze it), or if your freezer is set to simulate "Arctic" temperatures like mine :)

Last

This goes to Divya's Diet foods event

October 1, 2008

No-knead bread - Just for CLICKS!

IMG_2257

This is my first time participating in the "CLICK - The photo event" by Jugalbandi.
This month's theme is Click-Crusts

I thought it might be appropriate to bake something from their amazing collection of mouth watering breads. And that I did... very diligently picked out the No-Knead bread, and as usual in attempts to make it healthier blah blah... did some things that were just not meant to be changed.

Remember, this bread I made is just for clicks, if you want the original recipe check it out here.
All that said, I do really like the way it looks! The crust wasn't that bad to taste either.
Now this may sound weird, and it probably is from plopping the gooey dough into the pan and the skin must have folded into itself... Do you see a toothless granny smiling at you in the image above?
Just making sure that the image is stuck in your head... Good!

So now, if you want to learn from my mistakes, here we go:

Do not substitute the all purpose flour with whole wheat flour. This is just not the place for it. The bread turned out really tough, almost inedible after a day.

Do not use highly active, rapid rise yeast. The whole dough just smells stale the next day. I used it because I did not have the Instant yeast that the recipe called for. I never have things that I need, when I need!

You definitely WILL need a huge pan/crock pot WITH a lid. I used a normal baking pan. I tried to plop the dough into a preheated pan and covering it with aluminium foil. You will only end up burning yourself.
If you really want good no-knead bread, go out and get yourself the hardware it requires.

IMG_2270

The bread has high water content, so it is important to keep it covered while baking so that the water from the bread escapes as steam, creating little air pockets. This is my theory if I am right.
You can check out a video here on how to make no-knead bread, it might help you understand the process a little bit more clearly.

IMG_2268